Reglet Flashing for Metal Roofs on Masonry Walls
When a metal roof meets a masonry wall, water looks for the smallest opening. That opening is often at the roof edge, where metal, mortar, and sealant all move at different rates. Reglet flashing gives that joint a mechanical path for water to shed, instead of asking a bead of caulk to do all the work.
That matters even more in Florida. Wind-driven rain pushes hard against walls, heat expands the metal, and masonry stays stiff. The detail has to handle all of that without opening up.
What reglet flashing does at a masonry wall
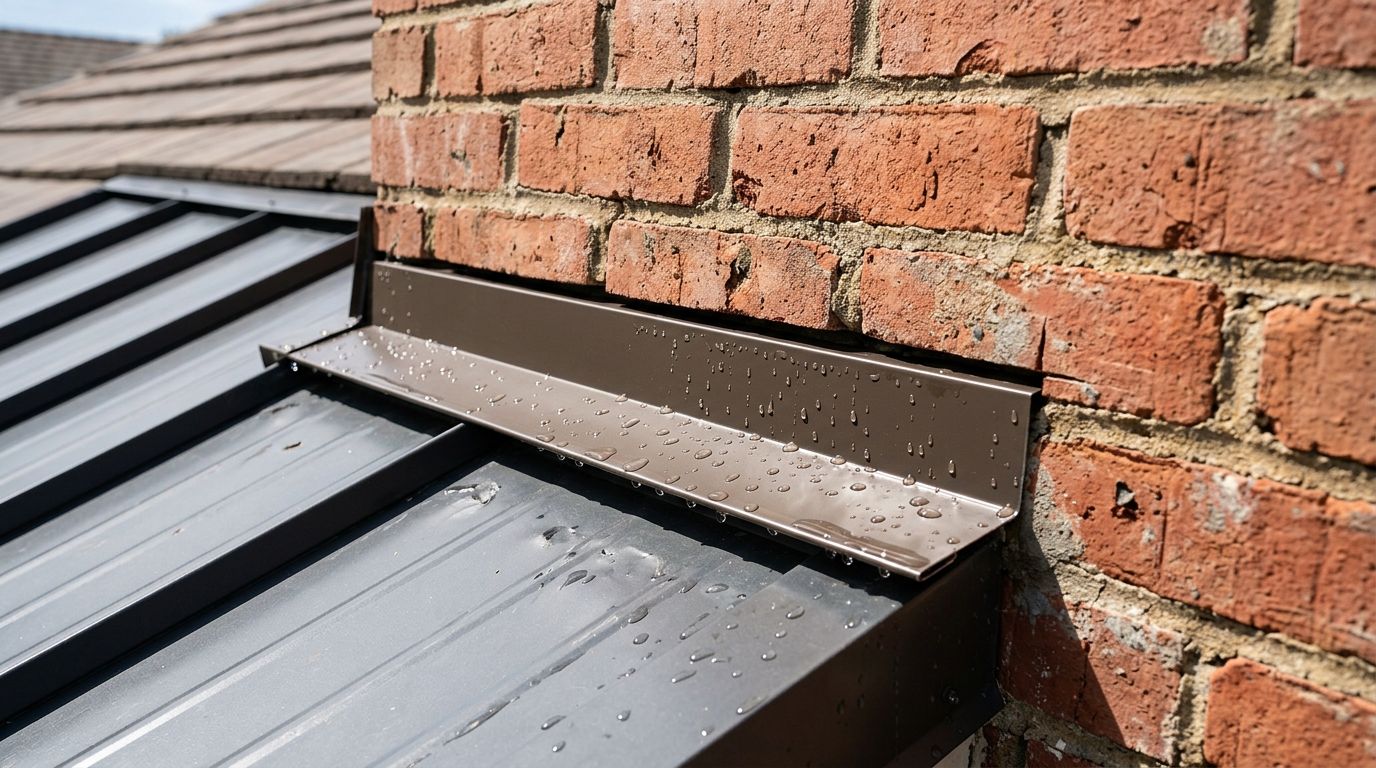
A reglet is a narrow slot cut into masonry, usually in a mortar joint or another planned termination line. The counterflashing fits into that slot and covers the top of the roof-side flashing. In plain terms, the base flashing catches the water, and the reglet counterflashing hides and protects the joint.
That setup works because the roof and wall do different jobs. Metal roofing expands and contracts with temperature. Masonry moves less, but it can crack, spall, or shift at joints. If both materials are locked together with only surface sealant, the joint becomes a weak point.
A good reglet detail also gives water a clear path. The roof flashing turns up the wall, the counterflashing laps over it, and any water that reaches the joint drains back out. The overlap matters more than appearance.
A clean-looking seal can still fail if the detail has no real lap or drainage path.
For a broader look at the roof-to-wall sequence, metal roof sidewall flashing guide covers how layers should shed water in the right order.
How the parts work together
The exact shape depends on the roof panel, the wall surface, and the edge condition. A standing seam roof doesn't meet a wall the same way a ribbed panel does. A parapet wall also needs a different finish than a simple sidewall.
The table below shows the common wall-to-roof situations and what each one needs.
| Scenario | What it means | What the detail needs | Main risk if done poorly |
|---|---|---|---|
| Sidewall against masonry | Roof panels run up to a vertical wall | Base flashing, reglet counterflashing, clean laps | Water gets behind the trim edge |
| Parapet wall | Roof terminates into the top or face of a wall | Strong top cap, counterflashing, good drainage path | Ponding and overflow at the wall top |
| Short masonry return | A small wall corner or pilaster interrupts the roof line | Tighter corner work, formed pieces, sealed ends | Gaps at corners and cut edges |
| Chimney-like projection | A masonry mass rises through or beside the roof | Counterflashing that can move with the roof | Sealant failure at a rigid joint |
A parapet often needs a more careful termination because the wall cap and flashing have to work together. For that type of detail, flashing a metal roof to a parapet wall follows the same core idea, a protected lap with no open edge left behind.
The same principle shows up around masonry chimneys too. Chimney counterflashing on masonry works because the counterflashing is tied to the wall, while the roof flashing can still move.
Best sequencing for a watertight termination
The order of work matters. A neat finish at the end won't save a bad sequence.
- Inspect the wall and roof edge first. Check for cracked mortar, loose block, damaged underlayment, and bent panel edges. Fix those problems before the flashing goes on.
- Set the roof-side flashing. The base flashing should turn up the wall high enough to catch runoff. It needs a clean, straight line and proper laps at each seam.
- Prepare the reglet slot or approved termination. The slot should be planned where the masonry can accept it without weakening a bad area. Loose mortar and crumbling edges need repair first.
- Install the counterflashing. It should tuck into the reglet and cover the top edge of the base flashing. The lap should shed water, not trap it.
- Seal only the exposed edges and corners. Sealant belongs at end dams, corners, and selected terminations. It should not replace the overlap itself.
- Check fasteners and movement allowance. Fasteners need to hold the metal without pinning it so hard that it tears during thermal movement. Over-tightening can cause just as many problems as loose work.
The goal is simple. Water should hit one layer, then move to the next, then drain away. If a detail makes water cross a flat seam uphill, it needs a second look.
Common failure points in Florida conditions
Florida weather exposes weak flashing fast. The sun ages sealant, storms drive water sideways, and hot days push metal to expand.
The most common failures include these:
- Sealant-only terminations that look fine at first, then crack and pull away.
- Open or shallow reglet cuts that do not give the counterflashing enough bite.
- Loose mortar joints that crumble after the slot is cut.
- Mixed metals that corrode when they touch in the wrong way.
- Short laps at corners where water runs behind the trim.
- Fasteners placed where movement is highest , which can elongate holes over time.
- Poorly tied roof edges where panel ribs, closures, and trim do not line up cleanly.
Masonry walls also hide problems longer than framed walls do. A leak may show up as a stain far from the real opening. By the time you see it indoors, the flashing detail may already be failing behind the wall face.
A second issue is wind pressure. When gusts hit a wall, they can drive water upward into tiny gaps. That is why reglet flashing needs more than cosmetic coverage. It needs depth, overlap, and a path for water to leave.
Inspection tips for homeowners and contractors
A quick visual check can catch trouble early. Start at the wall top, then move down the roof line.
Look for these signs after heavy rain or a storm:
- Stains, efflorescence, or rust streaks on the masonry below the joint.
- Gaps where counterflashing meets the wall or where the reglet was sealed.
- Loose trim edges that lift when you press them.
- Cracked mortar around the reglet slot.
- Sealant that has split, shrunk, or pulled away from the wall.
- Fasteners that back out or show corrosion.
Inside the building, check the ceiling line and any attic space near the wall. Damp insulation, dark wood, or drip marks often point to a wall-to-roof issue rather than a roof field leak.
If the wall has been painted or stuccoed, the problem can be harder to spot. The finish may hide a split joint for months. That is why inspection should include both the outside edge and the inside line of the wall.
When a design review makes sense
Some wall details are simple. Others need a closer look before anyone cuts masonry or bends trim.
A design review helps when the wall is tall, the geometry is irregular, or the roof system uses longer panels with noticeable thermal movement. It also helps when the masonry is old, patched, or part of a mixed wall assembly. In those cases, the reglet location, fastener choice, and flashing profile all matter more than usual.
Review is also smart when the project uses custom trim lengths or a special panel profile. A formed piece that looks close on paper can fail in the field if the lap is too short or the edge line is wrong. That is one reason detailed roof-to-wall planning matters before fabrication starts.
Contractors should also slow down when the wall meets a code-sensitive edge condition or a high-wind exposure area. The flashing has to match the roof system, the wall material, and the local load demands. A good sketch can save a lot of field rework.
Conclusion
A solid masonry wall detail is not about hiding the joint. It is about giving water a clear, durable path away from the opening. That is the real job of reglet flashing on a metal roof.
When the base flashing, counterflashing, and wall termination work together, the joint can handle Florida heat, wind, and rain much better. When the detail depends on sealant alone, it usually fails early.
If you remember one thing, make it this: the flashing should move with the roof and still stay locked into the wall. That balance is what keeps the leak from starting in the first place.
Share Our Metal Roofing News Articles
Related Posts