Metal Roof Clip Alignment Errors That Buckle Panels
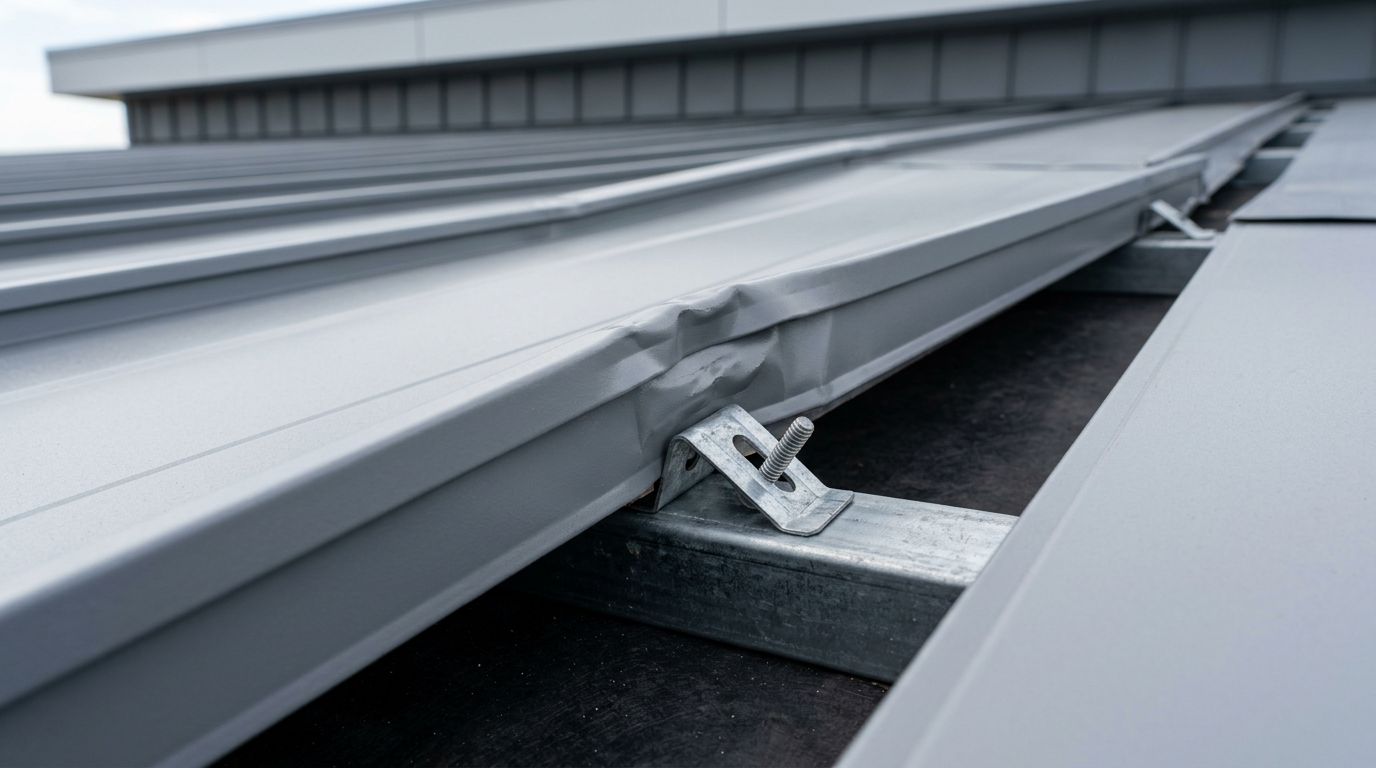
A standing seam roof can buckle even when the panels and fasteners are correct. Poor metal roof clip alignment often creates uneven restraint, forcing the panel to wrinkle, bow, or lift away from the roof plane.
The problem usually begins with the first panel, an incorrect clip line, the wrong clip type, or fasteners driven into an uneven substrate. Finding the source early is easier than correcting a buckled roof after the seams are locked.
Key Takeaways
- Clips must follow the manufacturer's layout, sit fully in the seam, and remain aligned with the roof framing.
- A crooked first panel can shift every following clip and create progressive panel buckling.
- Fixed and floating clips handle thermal movement differently, so they aren't interchangeable.
- Loose, overdriven, rotated, or misplaced clip fasteners can restrict panel movement or distort the seam.
- Don't flatten buckled panels with extra screws. Identify the restraint problem and follow the panel manufacturer's repair instructions.
How Metal Roof Clip Alignment Causes Panel Buckling
Standing seam panels expand and contract as roof temperatures change. The panel needs secure attachment, but it also needs the movement allowed by its design. Clips provide that attachment without placing exposed fasteners through the panel surface.
When clips don't align, the panel receives uneven restraint along its length. One section may slide normally while another section remains locked in place. As the steel expands, the trapped section can bow between clips or push against a seam.
The result may look like oil canning, a broad, shallow wave across the panel. However, clip-related buckling often has a more localized pattern. You may see wrinkles near a seam, a bowed panel edge, or a ridge that repeats at clip locations.
Several alignment problems can produce this condition:
- A clip line runs diagonally instead of parallel with the panel seam.
- Clips sit outside the seam pocket or fail to engage the seam correctly.
- A clip base bridges a high spot, low spot, or open gap in the roof substrate.
- The installer pulls the panel sideways to reach a misplaced clip.
- A fastener draws the clip down while twisting it out of position.
- The layout uses fixed clips where the system calls for floating clips.
The panel, clip, and supporting structure work as one assembly. A correction that addresses only the visible wrinkle may leave the underlying restraint problem in place.
A panel can appear flat during installation and buckle later when heat causes it to move against a misaligned clip line.
Before diagnosing the panels, confirm the roof system. Exposed-fastener AG or Multi-Rib panels usually don't use standing seam clips in the same way. Standing seam, snap-lock, and mechanically seamed systems each have their own clip profiles, seam dimensions, spacing schedules, and installation requirements.
The Most Common Clip Alignment Errors
Starting with a crooked first panel
The first panel controls the position of every panel that follows it. If the eave edge isn't square with the roof line, the installer may compensate as the work progresses. That correction can move the seams away from the intended clip layout.
A small error at the first panel can become a much larger offset at the opposite end of a long roof. Clips may still appear close to their intended locations, but they no longer sit evenly in the seam or over the planned attachment line.
The installer should establish the eave line, rake line, and panel direction before placing the first panel. A chalk line or laser can help confirm that the starting edge remains straight. The exact layout method should follow the panel supplier's instructions and the roof's approved assembly.
Rotating or partially seating the clip
A clip needs full contact with the panel seam and a stable base on the supporting surface. A rotated clip can force one side of the seam outward. A partially seated clip may also prevent the seam from closing correctly.
These errors often occur when the clip is installed before the panel is positioned completely. Dirt, sealant, metal shavings, or a damaged seam can hold the clip out of place. The installer then tightens the screw, hiding the problem under the clip base.
A properly seated clip shouldn't require the panel to bend or twist into position. If the panel must be forced over the clip, stop and inspect the seam, clip model, and layout.
Using the wrong clip or spacing
Clip geometry is system-specific. A clip made for one panel profile may not fit another profile, even if both roofs look similar. The wrong clip can pinch the seam, leave excessive play, or change how the panel transfers wind forces to the structure.
Spacing errors also affect the assembly. The required distance depends on the panel, clip type, roof zones, wind pressures, substrate, and approval documents. A generic spacing pattern may not match a Florida project.
For standing seam work, review the project drawings and standing seam clip spacing guide before ordering or installing clips. Pay close attention to perimeter and corner zones, where wind pressures can require a different clip schedule or clip capacity.
Fixed and Floating Clips Must Match the Panel Design
Fixed clips hold the panel at a set point. Floating clips allow controlled movement along the panel length through a slotted or movable connection. The correct choice depends on the roof system, panel length, thermal movement, and the manufacturer's engineering.
Installing fixed clips where floating clips are required can restrict panel movement. As the panel grows in hot weather, stress builds between fixed attachment points. The panel may buckle, the seam may distort, or fasteners may experience added force.
The opposite mistake can also create problems. Floating clips may not provide the attachment behavior required by a particular approved assembly or roof area. A clip that allows movement isn't automatically suitable for every panel or wind condition.
Review the supplier's specifications before installation, especially on long Florida roof slopes exposed to intense heat. Mid Florida Metal Roofing Supply's guidance on fixed and floating standing seam clips can help installers compare the movement behavior of each clip type, but the project-specific manufacturer's instructions control.
Clip orientation matters as well. A floating clip may have a designated direction for movement. Reversing it or fastening through the wrong portion of the slot can remove the movement the system was designed to provide.
How to Inspect a Buckled Metal Roof Panel
Start from the ground and document the affected areas. Look for repeated wrinkles, raised seams, displaced trim, loose fasteners, and changes that follow a straight clip line. Photos taken from the eave and roof slope can help compare the panel shape with the attachment pattern.
A qualified installer can then inspect the roof surface without damaging the panels. Walking directly on seams, ribs, or unsupported areas can create new dents and distortions. Use the access method recommended for the panel system and follow proper fall protection procedures.
Check these conditions in order:
- Panel direction and starting edge: Confirm that the first panel is square and that the seams run parallel to the intended layout.
- Clip engagement: Look for clips that sit outside the seam, lean, rotate, or fail to seat fully.
- Fastener placement: Check for screws driven at an angle, overdriven screws, stripped holes, or fasteners placed outside the approved location.
- Substrate condition: Inspect purlins, decking, clips, and framing for high spots, gaps, misalignment, or movement.
- Clip type and spacing: Compare the installed parts with the panel manufacturer's drawings and the project's wind-load requirements.
- Thermal movement: Determine whether the roof uses fixed clips, floating clips, or a defined combination of both.
A roof can also buckle because of substrate deflection, panel damage, improper seaming, trapped debris, or excessive restraint at trim. Clip alignment may be part of the problem without being the only cause.
Oil canning deserves careful attention. Mild waviness can result from steel flatness, panel width, roof geometry, handling, or lighting and may not indicate an attachment failure. Sharp creases, growing distortion, open seams, or buckling concentrated around clips require a professional assessment.
Correcting Clip Alignment Before and After Seaming
Correction is easiest before the panels are fully seamed. Remove the affected panel or reposition it according to the system instructions. Then reset the clip line, correct the substrate issue, and replace any damaged clip or fastener.
Don't drag a panel sideways across several clips. That action can deform the seam and leave the panel under constant tension. Instead, release the obstruction, confirm the layout, and place the panel back into its intended position.
If the roof is already seamed, the repair may require opening or removing panels. The correct method depends on whether the system is snap-lock or mechanically seamed, as well as the panel profile and seaming equipment. A standing seam panel installation guide provides useful installation context, but a finished roof should follow the exact instructions for its manufacturer and assembly.
Avoid these common short-term fixes:
- Adding exposed screws through the panel to hold down a wrinkle.
- Over-tightening clips to flatten a panel.
- Cutting a slot or enlarging a hole without written system approval.
- Replacing a floating clip with a fixed clip because it is easier to install.
- Sealing over a distorted seam without checking its engagement.
- Hammering or walking on the panel to force it flat.
Those actions can create leaks, reduce thermal movement, weaken the attachment, or void approval requirements. In Florida, repairs also need to account for the project's applicable product approval, wind zone, and inspection requirements. High-wind or HVHZ work may require review by the manufacturer, a licensed roofing professional, or a Florida-licensed engineer.
For a new installation, inspect the clip layout before closing each seam. Verify the first panel, clip orientation, fastener seating, spacing, and substrate contact while the work remains accessible. Once several panels are seamed, a small alignment error becomes harder to isolate.
Preventing Buckling on the Next Installation
Begin with the exact panel profile and clip package. Don't mix components based on appearance or assumed compatibility. Confirm that the clips, screws, seam geometry, underlayment, substrate, and trim belong to the same approved assembly.
Mark the layout before placing panels. The roof framing or decking must provide a consistent plane, and the clip lines should match the approved attachment schedule. Where the substrate is uneven, correct the supporting structure before covering it.
The first panel deserves extra time because every later panel depends on its position. Check its square, eave alignment, rake relationship, and seam location. After the first few clips are installed, measure again rather than assuming the line remains straight.
During installation, keep the panels clean and free of metal scraps that can interfere with the seam. Set each clip fully, use the required fastener, and stop if the panel needs force to engage. Follow the manufacturer's seaming sequence, since a seam that looks closed may not be fully locked.
Finally, record the clip type, spacing, roof zones, and any approved field adjustments. That information helps with inspections and gives the property owner a useful maintenance record.
Conclusion
Metal roof clip alignment affects both panel appearance and roof performance. Crooked clip lines, incomplete seating, wrong clip types, uneven substrates, and restricted thermal movement can all place stress where the panel wasn't designed to carry it.
A buckled panel shouldn't be flattened with extra screws or force. Trace the distortion back to the clip layout and supporting structure, then use the manufacturer's repair procedure. When the cause is uncertain, stop work and consult the panel supplier or a qualified metal-roof professional before making changes.
Share Our Metal Roofing News Articles
Related Posts