How to Install Lean-To Roof Flashing on a Pole Barn
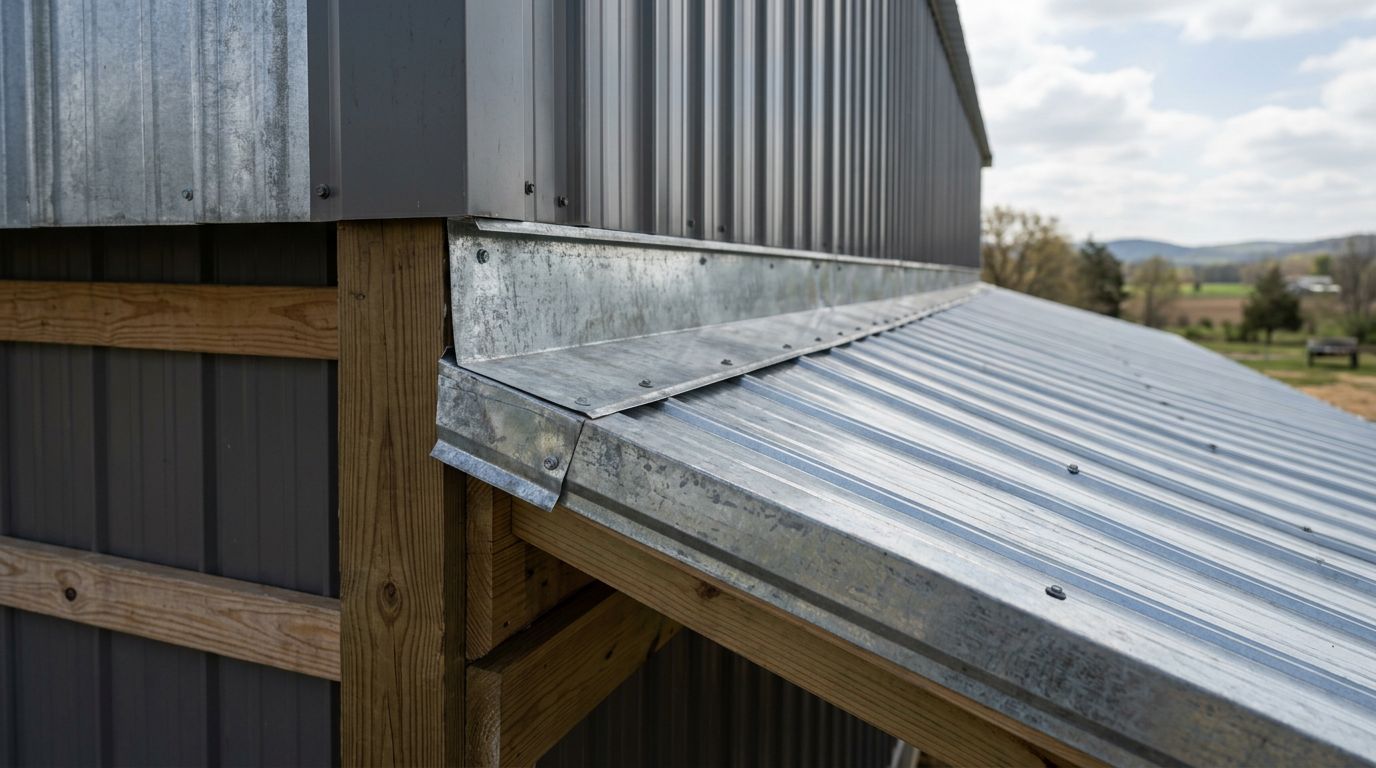
A lean-to can add useful storage, but the roof-to-wall joint can become the first leak point. Proper lean-to roof flashing directs rain over the metal panels instead of behind the pole barn siding.
The installation depends on the existing wall, panel profile, roof pitch, and local wind requirements. Use the approved details for your roofing system, and get professional help when the work involves structural changes or a difficult waterproofing tie-in.
Plan the Pole Barn Roof-to-Wall Connection
Before buying flashing, determine exactly where the lean-to roof will meet the pole barn. A typical lean-to slopes away from the barn, so its upper edge meets the barn's vertical sidewall. That upper connection needs headwall or transition flashing. The sloped outer edges may also need sidewall flashing.
Measure the roof pitch and identify the existing wall construction. Pole barns may have metal siding over girts, housewrap, plywood, or other wall layers. The flashing must connect with the wall's water-shedding layers, not stop against the outside face of the siding.
Inspect the barn before installation. Look for:
- The location of wall girts and structural posts.
- Existing trim, siding laps, and fastener lines.
- The lean-to roof height and planned overhang.
- Electrical lines, plumbing, or other utilities near the work area.
- Any rot, corrosion, or previous water damage.
The lean-to framing must support the roof panels and flashing. Do not remove a post, cut a girt, or alter the roof framing without advice from a qualified builder or engineer. Flashing cannot correct a structure that moves, sags, or lacks proper support.
Purlin spacing also affects how the metal panels lie and where fasteners can hold. Follow the panel manufacturer's approved span and fastening schedule. For Florida projects, review the requirements for the panel profile, gauge, fasteners, and wind zone. Metal roof purlin spacing for pole barns can help with the framing questions that come before panel installation.
The upper flashing leg needs a protected connection behind the wall's weather layer. A bead of caulk placed against the siding is not a substitute for that connection.
Choose Flashing That Matches the Panel System
Use flashing made for the same metal roofing system whenever possible. The profile, rib height, finish, and material thickness all affect how the trim fits. A flat piece of sheet metal may look suitable, but it can leave gaps over panel ribs or create pockets where water collects.
For a common exposed-fastener panel, the roof-side flashing usually has a vertical or angled leg that rises against the pole barn wall and a lower leg that extends over the lean-to panels. The lower leg should cover the upper panel termination according to the manufacturer's detail.
The wall-side leg may slide behind existing siding or under a wall trim piece. On some retrofits, the siding must be removed and reinstalled. A custom-bent transition trim often produces a cleaner result than trying to force standard trim into an unusual corner.
You will typically need:
- Headwall or transition flashing for the upper roof edge.
- Sidewall flashing for sloped edges that meet the barn wall.
- Profile-matched foam closures where the panel design requires them.
- Roofing screws with compatible EPDM washers.
- Butyl tape for approved trim laps.
- A compatible metal-roof sealant.
- Replacement wall fasteners and trim, if siding must be removed.
- Aviation snips, a drill, a chalk line, a tape measure, and a hand seamer.
Use the same or compatible metal for the panels and trim. Dissimilar metals can accelerate corrosion, especially in Florida's humid, salty coastal conditions. Never mix sealants, tapes, or coatings without checking that they are compatible with the panel finish.
Install Lean-To Roof Flashing in the Right Order
The installation sequence matters because each upper layer should shed water over the layer below it. Work only when the roof is dry and weather conditions are safe.
1. Prepare the wall and roof framing
Complete the lean-to framing, roof deck if the system requires one, purlins, fascia, and wall support before installing panels. Confirm that the roof plane has the required slope for the selected metal panel. Low-slope roofs need closer attention to the manufacturer's minimum pitch and lap details.
If the pole barn siding covers the connection area, remove only the panels and trim needed to install the upper flashing leg. Keep the removed pieces organized so you can reinstall them in their original lap direction.
Repair damaged wall materials before flashing. The wall must provide a sound surface for fasteners and a continuous water-resistive layer.
2. Install underlayment and closures
Install the specified underlayment on the lean-to roof, following the panel system's instructions. At the top edge, place the required closure material over or under the panel ribs as shown in the approved detail.
Closures fill the shaped gaps beneath the metal panel. They also help prevent wind-driven rain, insects, and debris from entering the opening. Do not compress them so much that the panel distorts, and do not leave open rib channels where the detail calls for closures.
Keep the underlayment and closures arranged so water can move toward the eave. Avoid creating a sealed pocket that traps moisture against the framing.
3. Fit the upper transition flashing
Dry-fit the transition flashing before applying sealant. The wall leg should reach far enough behind the siding, wall trim, or weather-resistive barrier to form a protected lap. The roof leg should sit flat over the upper portion of the lean-to panels.
Mark the flashing so it remains straight across the wall. If the pole barn wall is uneven, use a hand seamer to make controlled adjustments. Avoid sharp bends that can crack the coating or prevent the trim from sitting tightly against the panels.
Where separate pieces meet, use the lap length and sealant specified for the flashing system. Apply butyl tape or sealant in the approved location, then fasten the overlap so it stays compressed. Do not place fasteners where they prevent the next wall or roof layer from covering the penetration.
4. Install the metal roof panels
Lay the lean-to panels square to the eave and aligned with the roof framing. A panel that starts out of square can create widening gaps at the upper wall connection.
Fasten the panels according to the manufacturer's pattern. Use the correct screw length and place screws in the recommended areas of the panel ribs or flats. Drive each screw straight. The washer should compress against the metal without spinning, splitting, or becoming visibly crushed.
At the upper end, follow the panel profile detail for the transition flashing. Some systems require a specific setback, sealant line, or closure arrangement. Do not bend panel ends randomly to close gaps, because that can interfere with drainage and panel movement.
5. Reinstall the wall siding and trim
Slide the wall siding or counterflashing over the upper flashing leg in the correct lap direction. The wall material should shed water onto the flashing, while the flashing sheds water onto the roof panels.
Replace damaged screws and keep fastener spacing consistent with the existing wall system. Seal penetrations only where the approved detail calls for sealant. Excess caulk on the face of the joint can hide a gap without fixing the water path.
For more complex wall connections, review these metal roof sidewall flashing details. The same basic rule applies, each layer must overlap the next in the direction water travels.
Handle Side Edges, Corners, and Panel Ribs
The upper wall connection gets most of the attention, but the lean-to's sloped side edges need a complete flashing path too. Sidewall flashing should run along the joint where the roof panels meet the pole barn wall or endwall.
Install sidewall pieces so water from the upper transition moves onto them without entering an open corner. Trim the flashing around panel ribs with snips, then use a hand seamer to form neat folds. Avoid cuts that leave a wide notch around a rib.
At the bottom of a sidewall run, direct water toward the eave trim or another approved drainage point. Do not stop the flashing above the eave and leave an exposed open end. Corner pieces should overlap in the same direction as the roof's drainage path.
Pay close attention to panel laps. Butyl tape belongs between clean, dry metal surfaces where the system calls for it. Sealant should support the flashing design, not replace a proper lap or closure.
If the lean-to roof meets a masonry wall, stucco wall, or an irregular existing structure, the detail changes. Those conditions may require counterflashing, reglets, or custom metalwork. A roofing professional should handle the connection when you cannot create a continuous, protected lap.
Inspect the Finished Flashing Before Water Testing
Walk the roof from a safe position and inspect every transition before the final cleanup. Look for lifted flashing, exposed sealant edges, missing closures, crooked panel lines, and screws with damaged washers.
Check that:
- The wall leg is covered by siding, trim, or another approved counterflashing layer.
- Flashing laps point in the direction water flows.
- Panel ribs are closed where the system requires closures.
- No screw penetrates outside the intended fastening line.
- The sealant is continuous at approved laps and end conditions.
- Water has a clear path toward the lean-to eave.
Test the joint with a garden hose after the sealant has cured according to its product instructions. Start at the lower portion, then work upward in small sections. Never use a pressure washer or spray water upward under the flashing.
Have someone inspect the interior while you test. If water appears, stop the test and trace the leak from the highest wet point. Water can travel along ribs, underlayment, or framing before it reaches the interior stain.
Roof work carries fall, electrical, and weather risks. Use a properly secured ladder, wear slip-resistant footwear, keep tools restrained, and avoid windy or wet conditions. Do not work alone on a high roof. A professional should handle steep roofs, structural modifications, damaged framing, and any tie-in where the waterproofing layers are unclear.
Conclusion
A reliable lean-to roof connection depends on more than covering the joint with metal. The upper flashing must reach behind the wall's water-shedding layer, the roof leg must overlap the panels, and closures, laps, fasteners, and sealants must match the panel system.
Plan the framing first, install each layer in drainage order, and inspect the connection before exposing it to heavy Florida rain. When the wall construction or structural tie-in is uncertain, professional installation is safer than trying to seal a problem after the first leak.
Share Our Metal Roofing News Articles
Related Posts