How to Install Standing Seam Roof Hips Correctly
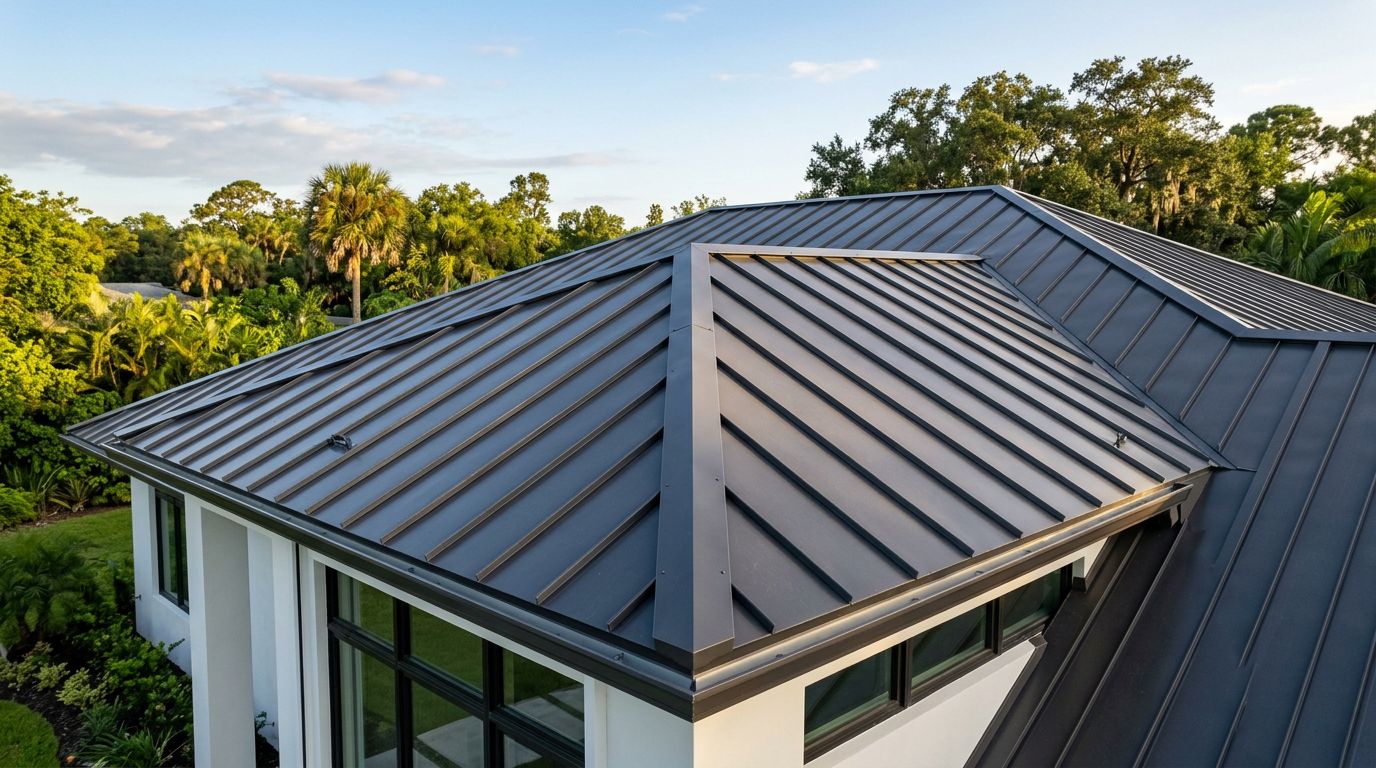
A hip is where two sloping roof planes meet, so even a small layout error can send water beneath the metal. Learning how to install standing seam roof hips starts with treating the hip as part of a complete roofing system, not as a cap added at the end.
The correct panel layout, clip spacing, closures, sealant, and hip flashing depend on the profile and manufacturer. Florida projects also need details that match the applicable building code and product approval. Prepare the roof carefully, follow the approved installation manual, and use proper fall protection before cutting a single panel.
Understand the Hip Layout Before Installing Panels
A standing seam hip usually includes roof panels that run upward from the eave toward the hip, a formed hip transition, and a cap that covers the joint between the two roof slopes. The exact design changes with the panel profile. Snap-lock panels, nail-strip panels, and mechanically seamed panels don't use the same attachment or finishing details.
Start with the roof plan and the panel manufacturer's drawings. Confirm the roof pitch, hip angle, eave details, ridge condition, panel width, seam height, and location of valleys or penetrations. Check whether the system requires a continuous hip cleat, individual cleats, a formed receiver, or another approved support.
Before ordering materials, verify the available standing seam panels, trim profiles, fasteners, sealants, and closures. Panels should come from the same approved system as the trims whenever possible. Mixing profiles or accessories can change how the seams lock and how the hip cap seals.
Measure both roof planes. A hip rarely divides a roof into perfectly equal sections, especially on additions or irregular floor plans. Use the actual roof dimensions rather than assuming the framing is square. Compare diagonal measurements, snap control lines, and identify the panel that will finish against each hip.
The hip cap needs enough width to cover the panel ends on both sides. However, excessive trimming can weaken the edge or leave too little metal for the manufacturer's hem and seal. Confirm the required reveal, setback, and cutback dimensions before making field cuts.
The hip cap hides the joint, but it can't correct panels that were installed out of square.
Prepare the Deck, Underlayment, and Eave
Standing seam panels need a sound, properly aligned substrate. Inspect the roof deck for damaged sheathing, uneven joints, protruding fasteners, and moisture damage. Replace weak areas before installing underlayment or metal. Uneven decking can telegraph through the panels and make the seams difficult to align at the hip.
Install the approved underlayment according to the roofing system and local code. At the hip, keep the underlayment continuous where the instructions allow it. Lap and seal it as required, but don't add products that can react with the panel coating or interfere with trim placement.
Install eave trim before the panels if the system requires it. The eave establishes the panel starting point, so it must run straight and remain parallel with the roof edge. Measure from the eave to the hip on both sides. If the eave line is crooked, the error becomes more visible as the panels approach the hip.
Mark the panel layout on the underlayment or temporary reference boards. The first panel on each roof plane deserves extra attention. Confirm that its seam sits at the planned location and that the panel edge leaves enough room for the hip detail. A narrow, uneven strip at the hip often indicates that the initial layout was wrong.
For Florida construction, review the project requirements for wind uplift, fastener type, clip spacing, substrate, and approved assembly. The manufacturer's Florida approval may specify details that differ from a general installation guide. Use the approval and local code requirements that apply to the building.
Keep the roof surface clean. Metal shavings, cutoffs, and dropped fasteners can scratch the finish or cause rust staining. Remove debris at the end of each work period, and don't drag panels across the underlayment.
Install the Panels Toward the Hip
The installation sequence varies, but the following process covers the main field decisions. The manufacturer's instructions control the exact dimensions and attachment pattern.
- Set the first panel on one roof plane. Align it with the eave trim and the layout line. Check that the panel is square to the eave before fastening or clipping it. A small error at the first panel can compound across the roof.
- Attach the panel using the specified system. Standing seam panels may use fixed clips, sliding clips, concealed nail strips, or another approved attachment. Place every clip at the required location and spacing. Don't substitute exposed screws unless the approved detail specifically calls for them.
- Add the next panels and check the seams. Lock or fasten each panel according to its profile. Keep the seams straight and avoid forcing a panel into alignment. If the seam doesn't engage easily, stop and check the panel position, clip orientation, and substrate.
- Approach the hip with full-length panels where practical. Full panels reduce joints and simplify water management. However, the final panel may require a measured cut or a custom transition. Measure the distance from the panel's usable edge to the hip line, not from a random roof feature.
- Repeat the process on the opposite roof plane. Establish matching reference points so the two sides meet at the planned hip location. The seams don't always align across a hip, but both panel edges must support the approved hip flashing.
- Secure the final panel edges. Use the manufacturer-specified cleat, clip, hem, or fastening detail at the hip. The cut edge needs support and weather protection. Leaving a raw edge loose beneath the cap can allow wind movement and water entry.
Panel cuts at a hip require accurate measurements. Mark the cut line on the back of the panel when possible, then use tools approved for coated sheet metal. Snips or a nibbler usually create less damaging debris than an abrasive saw. If you use a power tool, protect the panel surface and remove all metal filings immediately.
Don't notch across a standing seam without a detail that explains how to finish it. The seam may need to stop short of the hip, fold into a receiver, or receive a special closure. Cutting through the seam can remove the interlock and create a weak point.
Install Hip Closures, Cleats, and Flashing
Once the panel edges are prepared, install the hip components in the order shown by the manufacturer. Many systems use a formed hip trim or cap with closures that block wind-driven rain and insects. Others use a continuous cleat that holds the cap while allowing the metal to move.
Place closures on clean, dry metal. Compressible foam closures must match the panel profile and sit without gaps. Some systems require sealant at the closure, while others use a formed metal detail or butyl tape. Use only the sealant type and location listed in the instructions.
A continuous bead of sealant isn't a replacement for the correct closure. Too little sealant can leave gaps, but too much can prevent the cap from seating or trap water behind the flashing. Apply it in a controlled line, keep it away from drainage paths, and tool it only when the instructions permit.
Install the hip cleat or receiver so it remains straight from the eave toward the ridge. Fastener spacing, screw type, and setback must match the approved detail. Overdriving screws can distort the cleat and reduce its holding strength. Underdriven screws can leave movement or gaps beneath the cap.
The hip cap should cover the closure and engage the cleat without oil-canning or forced bends. Start at the lower end when the system directs that sequence, then work upward in manageable lengths. Maintain the required overlap between cap sections. Seal and fasten overlaps as specified, because an unsealed joint can leak even when the field panels are installed correctly.
At the ridge, connect the hip cap to the ridge cap using the manufacturer's transition detail. Don't improvise a flat patch over the intersection. The ridge and hip must shed water together, and the connection needs room for the approved closures and sealant.
Exact hip cutting and flashing dimensions are profile-specific. The manufacturer's installation manual controls when it differs from a general roofing practice.
Check the Finished Standing Seam Roof Hips
Inspect the hip before leaving the roof. Look for loose clips, incomplete seams, open closures, exposed cut edges, missing sealant, and distorted trim. Check both sides of the hip cap, especially at overlaps and at the ridge connection.
Run a straight visual line along the cap. Wavy trim can point to uneven cleats, inconsistent closures, or panels that were cut at different widths. Correct those conditions before they become concealed by later work.
Confirm that all fasteners sit flush where exposed fasteners are permitted. A crushed washer, overdriven screw, or screw placed outside the approved fastening zone can compromise the flashing. Replace damaged fasteners with the specified type instead of adding sealant over the problem.
Remove filings and metal scraps from the roof, gutters, valleys, and surrounding walls. Touch-up paint may be allowed for minor scratches, but only use a product approved for the panel finish. Don't paint over wet sealant or use an incompatible coating.
A water test can help identify a suspected problem, but it doesn't replace a complete inspection or the manufacturer's testing method. Never spray water uphill into a seam or flashing joint. Water applied in the wrong direction can create a condition that normal rainfall won't produce.
Document the panel profile, trim used, sealant, fastener type, and any approved field modifications. Keep the installation manual and product approval with the project records. This information helps with future repairs and verifies that the hip detail matches the roofing system.
Common Errors to Avoid at Roof Hips
The most common failure is poor panel layout. When the last panel becomes too narrow, installers may cut away necessary seam material or cover the gap with excessive sealant. Recheck the layout before installation, and order custom-width panels or trim when the design requires them.
Another mistake is using a generic ridge cap at the hip. Ridge and hip caps can look similar, but their closures, width, and connection details may differ. Use the cap designed for the panel profile and roof intersection.
Installers also sometimes place clips too close to a cut edge or omit the required hip attachment. That leaves the edge vulnerable to wind movement. Follow the approved clip and cleat schedule, including any enhanced fastening required for the Florida project location.
Avoid walking on unsupported panel ends. Stand over purlins, structural framing, or approved walk paths, and follow the panel manufacturer's access guidance. Sharp cut edges require gloves, and roof work requires fall protection suited to the slope and job conditions.
Finally, never guess when the hip detail is unclear. Stop work and contact the manufacturer, supplier, or qualified roofing professional. A few minutes spent confirming the detail is safer than hiding a wrong cut beneath the cap.
Conclusion
Installing standing seam roof hips requires careful layout, supported panel edges, matching closures, and a hip cap installed exactly as the approved system describes. The visible trim is only the final part of the assembly. Water control and wind performance depend on every layer beneath it.
Measure both roof planes, protect the panel finish, use the specified clips and sealant, and follow local Florida code requirements. When the panel manufacturer provides a different cutting, closure, or flashing detail, use that instruction. A well-installed hip begins with accurate preparation and ends with a clean, complete inspection.
Share Our Metal Roofing News Articles
Related Posts