
Install Metal Siding Around Windows and Personnel Doors
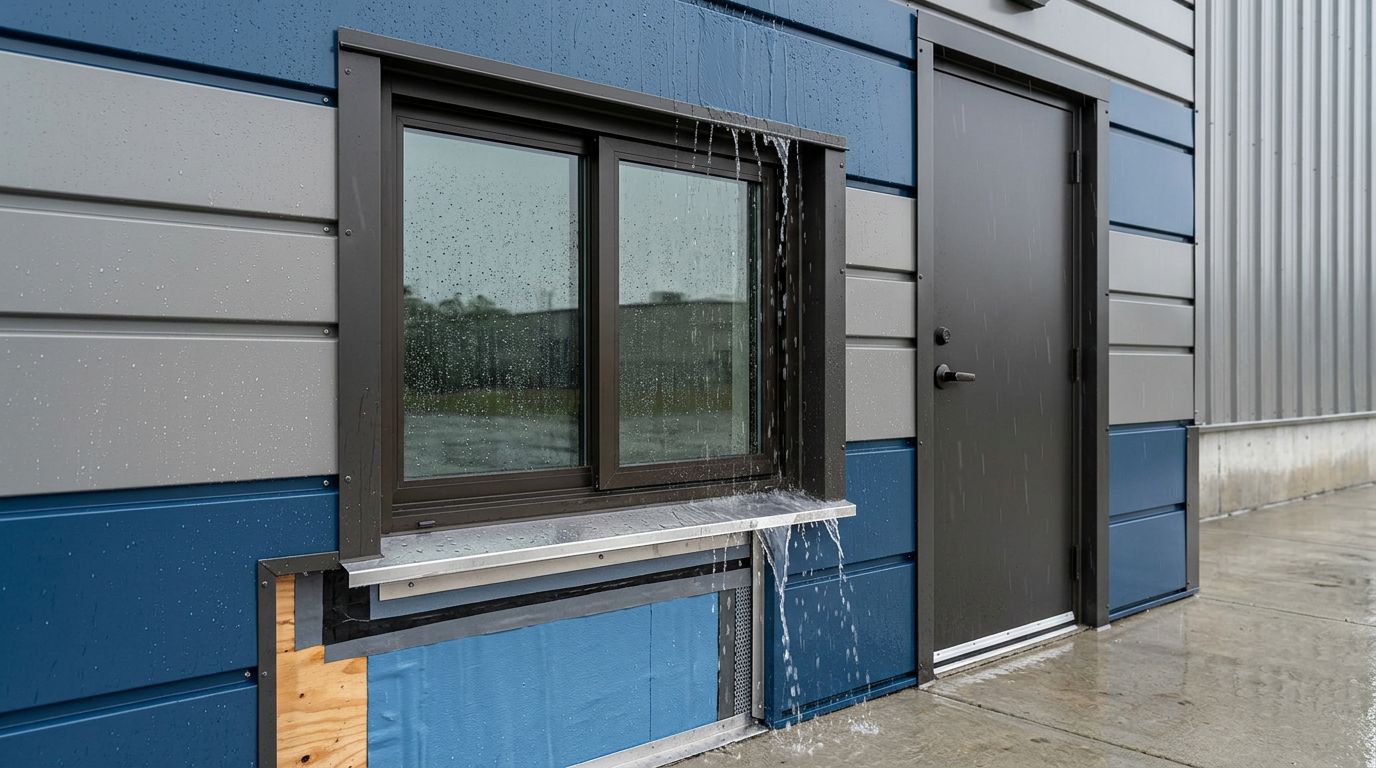
A metal wall can look watertight and still send rain behind a window trim. Long-lasting metal siding around windows depends on the water path behind the panels, not only on straight cuts and matching screws.
Every opening needs layers that work together: framing, a water-resistive barrier, sill protection, the window or door, flashing, trim, and panels. In Florida, wind-driven rain makes the order of those layers especially important.
Start with the opening and drainage details before bringing out the metal panels.
Inspect the Opening Before You Cut Panels
Metal siding can't correct a crooked window, a soft jamb, or an opening with missing flashing. Fix those conditions first, because trim only covers edges. It doesn't repair structural or water-management problems behind the wall.
Confirm the framing and finished opening size
Don't remove or alter a header, jack stud, or door framing member to make a panel fit. Those components carry loads above the opening. If the opening is out of square, the window or prehung personnel door may need adjustment before siding begins.
Check the installed frame for plumb, level, and square. Measure each side and both diagonals. Also inspect the sheathing and framing for rot, loose fasteners, or gaps that could admit water.
For a new window or door, follow the unit manufacturer's rough-opening dimensions. For an existing unit, measure the finished exterior frame or brick mold where the trim will meet it.
Use safe cutting and access practices
Metal panel edges and offcuts are sharp enough to cut through ordinary work gloves. Wear cut-resistant gloves, safety glasses, long sleeves, and hearing protection when using power tools.
Use a stable ladder on firm ground, and keep a helper nearby when handling long panels. Never carry a panel in high wind. Its broad face can act like a sail.
A hand shear, electric shear, or nibbler produces a clean edge. If you use a saw designed for metal, remove every steel shaving immediately. Hot filings can embed in the coating and later create rust spots. Avoid abrasive wheels that burn the paint edge and leave metal dust behind.
Build a Drainage Plane Behind the Trim
Water should always move outward and downward. That principle controls every tape lap, flashing overlap, and trim joint around a window or door.
The applicable Florida Building Code requires exterior openings to have flashing that prevents moisture entry and directs water to the exterior. It also calls for corrosion-resistant flashing installed in shingle fashion. Upper layers must lap over lower layers, never tuck behind them.
Flash the sill, jambs, and head in order
Install the water-resistive barrier, or WRB, over the wall sheathing before flashing the opening. A window or door manufacturer's published detail takes priority, especially when the product has a Florida Product Approval or a required wind-pressure rating.
At the sill, install a preformed pan or approved self-adhered flashing that directs water outward. The pan needs corner protection and a clear drainage route. Don't create a sealed trough that holds water against the sill framing.
Next, apply jamb flashing over the sill flashing. FEMA guidance for self-adhered flashing calls for jamb tape to overlap the sill flashing by at least 2 inches. Then apply head flashing over the jamb flashing, followed by the upper WRB flap over the head detail.
For a closer look at the layer order, review these WRB and tape details behind metal siding.
Keep head flashing above the visible trim
A head flashing, often called a drip cap or Z flashing, belongs above the top trim. Its upper leg tucks behind the WRB or upper weather layer. Its lower leg projects over the trim face, so water drips away from the opening.
Trim makes the panel edge look finished. Flashing sheds water. They have different jobs.
Sealant can close a small joint, but it can't replace a sill pan or a properly lapped head flashing.
Don't run a heavy bead of sealant across a drainage path or over a window's factory weep holes. Follow the window manufacturer's sealant locations, because some systems require sealed mounting flanges while others depend on open drainage points.
Measure Panels and Trim Before Ordering
Careful measuring prevents the common mistake of ordering panels that leave a narrow, awkward strip beside a window. A panel layout should look intentional, with ribs that stay plumb and cuts that disappear inside trim receivers.
Measure the actual exterior opening width and height in three places. Record the largest dimension, then check both diagonals for square. Measure from fixed layout lines, such as a building corner or a panel rib, rather than measuring from a wavy existing panel edge.
Map the ribs before cutting. If a cut will leave a very narrow panel piece along a jamb, shift the starting panel or adjust the layout before installation. Full or near-full panels look better and fasten more securely.
Know what each trim profile does
J-trim has a receiving pocket that hides a panel's cut edge. It often works well at narrow window jambs and panel terminations. F-trim generally gives more face coverage or a deeper receiving channel, although profile names differ among manufacturers.
Sill trim covers the top ends of panels below an opening. Head trim finishes the top panel termination, while head flashing goes above it to shed water. Outside corner trim, base trim, closures, and transition flashings may also be part of the wall system.
Compare the profile shape, face width, and channel depth before placing an order. This guide to J-trim versus F-trim for metal siding helps match trim to the opening instead of forcing a panel edge into the wrong profile.
If the jamb is unusually deep or the wall has added insulation, a custom brake-formed trim may fit better than bending leftover panel scraps on site.
Installing Metal Siding Around Windows Without Leaks
For the common vertical-panel layout, keep each panel plumb as it approaches the opening. A panel that starts slightly off at the corner can leave a visibly crooked rib at the window.
Dry-fit the opening trim before fastening panels. Confirm that the trim covers the cut edges, clears the window frame, and leaves room for the head flashing to lap correctly.
Use one test panel before cutting the full run
Mark cut lines on the back of the panel with a square and a fine-tip marker. Account for the depth of the trim receiver and any clearance stated in the panel instructions. Don't cut metal tight to the window frame, because normal movement can cause rubbing, noise, or buckled edges.
Cut one panel, test-fit it, and verify the rib alignment before cutting the rest. Keep factory edges visible where possible, especially on exposed vertical ends.
A dependable installation sequence is:
- Install base trim, corner trim, and the lower wall panels according to the panel manufacturer's detail.
- Set sill trim and side receiving trim in the order required by that trim system. Keep all flashing layers behind or above the pieces that must shed water.
- Cut and fasten panels below the window so their upper ends land cleanly inside the approved sill termination.
- Fit the side panels into the jamb trim, keeping the panel ribs straight and the cut edges fully covered.
- Install the upper panel pieces, head trim, and then the head flashing so the flashing laps over the top trim.
Horizontal wall panels use a different progression, because each panel lap must drain outward. Follow the panel-specific detail rather than copying a vertical-panel method.
Detail Personnel Doors at the Threshold and Header
A personnel door gets more abuse than a window. Foot traffic, door swings, deliveries, and pressure washing all test the threshold area. Keep the siding termination clear of the door operation and direct water away from the sill.
The door should already sit on a flashed sill pan or approved threshold detail. Metal siding must not trap water against the threshold, cover door weep paths, or interfere with the sweep at the bottom of the slab.
Tie door trim into the wall's drainage layers
Run the jamb trim vertically beside the exterior casing or brick mold. The trim should cover the panel edge without pinching the door frame. If the door has wide casing, use a profile with enough face width to hide the cut while leaving the casing visible.
At the top, install a corrosion-resistant head flashing that extends over the door trim. Its ends should direct water beyond the jamb area, not stop directly above it. The head flashing must also integrate with the WRB above the door.
The same principles used for metal siding around windows apply at a personnel door, but the threshold needs closer attention. Keep any required clearance at concrete, pavers, or stoops, and follow the door manufacturer's instructions for exterior sealant placement.
Fasten Panels and Trim Without Damaging the Metal
Use the screw type, length, and spacing listed for the panel profile and substrate. A screw that's too short can pull out under wind load. One that's too long can strike wiring, plumbing, or the door frame.
For exposed-fastener panels, drive the screw straight and compress the EPDM washer enough to seal. A washer squeezed out from under the screw head has been overdriven. A washer that spins freely hasn't sealed.
Place screws where the approved detail calls for them
Fastener location varies by panel profile. Many ribbed wall-panel details place screws in the flat beside a major rib, while other systems call for fastening through a rib. Don't switch locations because one method looks easier.
In Florida, wind zone, building height, corner conditions, substrate, and product approval can change the screw pattern. Review the applicable metal siding fastener placement guide before setting the layout.
Use corrosion-resistant fasteners and compatible trim screws. Install screws into solid framing, girts, or approved backing, not thin air behind sheathing. Keep fasteners away from unsupported cut edges, and use butyl tape or manufacturer-approved sealant only where the detail calls for it.
Profile-matched closures can block insects and wind-driven rain at panel ends. However, don't add closures where they block a designed drainage path.
Fix Common Window and Door Siding Problems
Most leaks around openings come from reversed laps, blocked drainage, or trim installed as decoration instead of part of a layered water detail. Inspect the work before the next storm, not after stains appear inside.
| Symptom | Likely cause | Practical correction |
|---|---|---|
| Water appears at the top corners | Head flashing sits behind trim or WRB | Rebuild the head detail so upper layers lap over lower layers |
| Dampness at the sill | Missing pan flashing or blocked drainage | Add the approved sill-pan detail and reopen the drainage route |
| A cut panel edge shows beside the jamb | Trim channel is too shallow or layout drifted | Replace it with a wider or deeper approved trim profile |
| Ripples form near screws | Fasteners are overdriven or panel alignment is off | Replace damaged fasteners and recheck plumb before continuing |
Test suspect areas with low-pressure water, starting below the opening and working upward. A pressure washer can force water into joints that would never see that pressure during rain.
When metal siding around windows is installed correctly, water stays on the face of the wall and exits at the bottom. That result comes from laps and flashing, not from more caulk.
A Dry Opening Starts Behind the Panels
Straight ribs and clean trim lines matter, but the hidden details protect the wall. Start with sound framing, install the WRB and flashing in shingle order, then fit panels and trim without blocking drainage.
Follow the panel, window, and door manufacturer's instructions, along with local code and Florida approval requirements. Water management should guide every cut and overlap around an opening.
Share Our Metal Roofing News Articles
Related Posts




