How to Dry-In a Roof Before Metal Panels Arrive
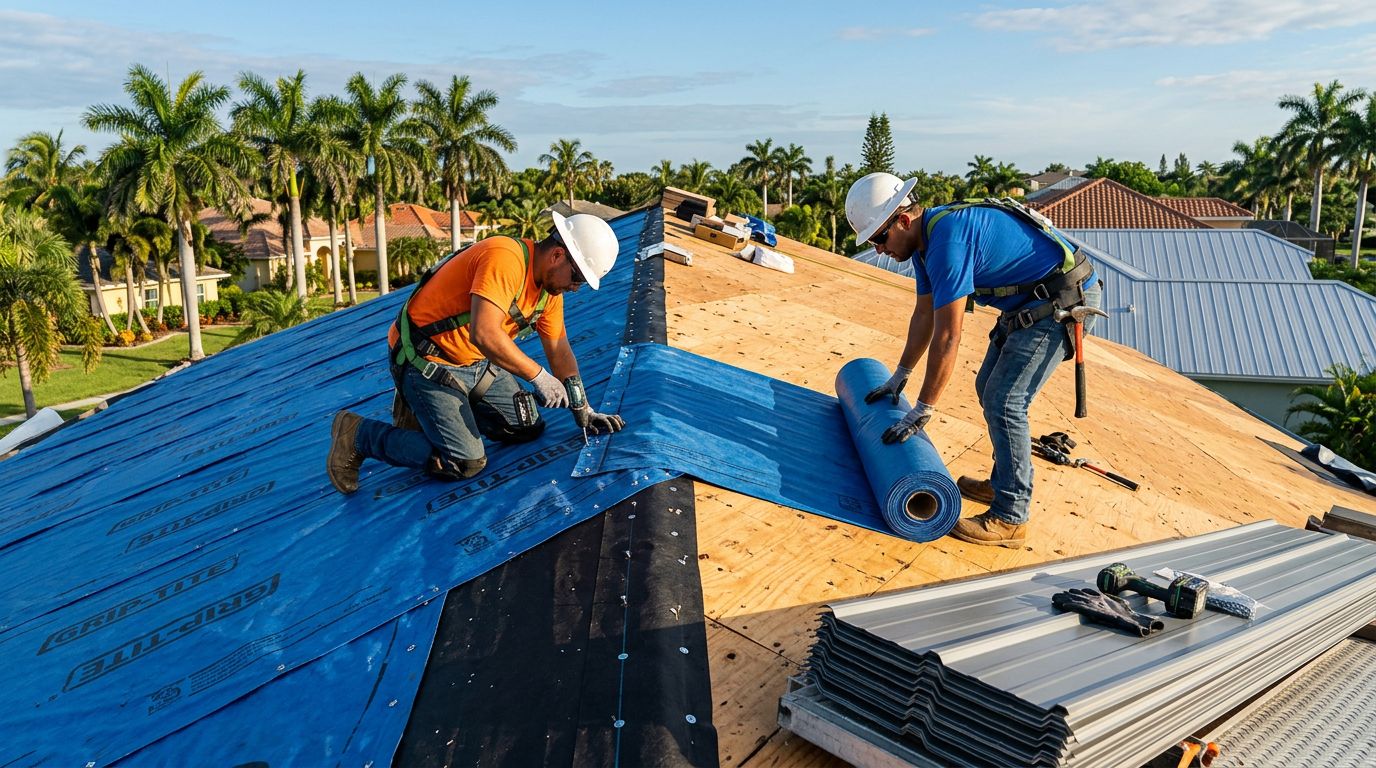
A roof can't wait for a delivery date, especially in Florida. If the panels are late, the deck still needs protection from rain, wind, and sudden afternoon storms.
That's where a roof dry-in comes in. It's the temporary weather layer that keeps the structure protected until the metal panels are ready to install.
Done well, it buys time without creating new problems. Done poorly, it traps moisture, lifts in the wind, and turns a small delay into a bigger repair.
What a roof dry-in needs to do
A good dry-in has one job first, keep water out. It also needs to stay flat, shed water cleanly, and hold tight until the metal roof goes on.
That sounds simple, but the details matter. Water follows the easiest path, so every lap, seam, edge, and fastener line has to work together. On Florida re-roofs, the dry-in stage can also tie into inspection and documentation needs, so it helps to know the Florida secondary water barrier requirements before the job starts.
Water always finds the low spot first, then the open edge, then the loose lap.
A solid dry-in usually does four things:
- Covers the deck before weather hits.
- Seals common leak points, such as edges and penetrations.
- Moves water off the roof instead of letting it pool.
- Stays attached if wind picks up.
The dry-in is temporary, but it still has to act like a real weather barrier. If it looks sloppy, it usually performs that way too.
Start with a clean, dry deck
Everything starts with the deck itself. If the surface is dirty, wet, or damaged, the dry-in will not sit right.
First, sweep off sawdust, nail scraps, old sealant, and loose debris. Then check for soft sheathing, cracked boards, lifted fasteners, and any areas that flex when you walk them. Replace bad sections before you cover anything.
Moisture matters just as much as damage. If the deck is damp from rain or from a previous tear-off, let it dry as much as possible before you install the temporary barrier. Trapping wet wood under underlayment can hold moisture against the structure longer than you want.
When the roof has multiple days between tear-off and panel delivery, protection should start the same day the deck is ready. A tarp can help for a short stretch, but it is not a good substitute for a proper dry-in. Tarps shift, pond water, and can funnel runoff into places that were dry before.
A clean deck gives you a better install and a better chance of a dry interior. It also makes the next steps faster, because you're not fighting bumps, dirt, or hidden soft spots.
Build the temporary weather barrier in the right order
Sequence matters more than speed. Start low and work high, so each layer overlaps the one below it and sheds water in the right direction.
A simple roof dry-in sequence looks like this:
- Inspect and repair the deck.
Fix damaged sheathing, tighten loose boards, and remove anything that could puncture the membrane. The deck should feel solid before the first sheet goes on. - Install edge metal and starter details first.
Eaves, rakes, and any required trim need to be in place before the main underlayment runs. That helps the dry-in tie into the roof edge instead of stopping short. - Lay the underlayment from the low point upward.
Roll it straight, keep the courses flat, and overlap each row in the direction water will travel. Avoid wrinkles, because wrinkles create little channels. - Reinforce valleys and penetrations.
These are the spots that take the most water and the most abuse. Cut neatly around pipes, vents, and skylights, then seal each opening the way the product calls for. - Fasten with the approved pattern.
Use the right fasteners, the right spacing, and the right pressure. If you need a reference, the metal roof underlayment fastening guide explains why cap fasteners and spacing matter so much in Florida weather. - Check the surface before you leave.
Walk the roof, look for lifted corners, open laps, missed fasteners, and gaps near details. Fix them before the next weather system rolls through.
A roof dry-in is only as good as its weakest edge. If one section is loose, water and wind will find it fast.
Handle edges, valleys, and penetrations first
The main field of the roof gets attention, but the edges do most of the work. Water starts there, and wind grabs there too.
Eaves need a clean tie-in so runoff leaves the roof instead of sneaking underneath. Rakes need the same care, especially where the roof meets gable trim or fascia. If the job includes drip edge or edge flashing choices, it helps to review eave detail best practices for metal roofing before the dry-in begins.
Valleys deserve extra time. They collect water from two roof planes, so any wrinkle, gap, or lifted lap can become a leak path. Keep the material flat and the seam lines straight. If the valley is wide or steep, the dry-in there should look neat, not crowded.
Penetrations are another weak point. Pipes, vents, chimneys, and skylights all interrupt the surface, which means the underlayment has to wrap, seal, and stay put. Trim carefully and avoid long slits that can open later. Small sloppy cuts become big problems after a few hot afternoons and one hard rain.
If the roof has multiple changes in slope, stop and inspect each transition. Those areas often collect water in ways that are easy to miss from the ground.
Fasten it so the wind can't lift it
Florida wind can turn a loose sheet into a sail. That is why fastening is not a small detail.
Use the fastener type approved for the underlayment and the deck. Cap nails or cap staples are common because they hold the membrane better than a bare fastener head. Just as important, the spacing has to match the product instructions and the roof conditions.
Do not overdrive the fasteners. A fastener that crushes the cap or tears the membrane creates a leak point. Do not leave them too loose either, because the membrane can flutter and wear itself out at the hole.
Laps need support, too. If a seam crosses an uneven board or a gap in the decking, the sheet can sag and collect water. Smooth support helps the dry-in stay flat and sheds water the way it should.
If the fastener schedule is off, the barrier can fail before the panels ever show up.
Take a second pass around the roof after fastening. Wind often reveals weak spots before rain does. A lifted corner at the edge or a missed fastener in a lap is much easier to fix before the next storm.
Protect the roof until the panels arrive
Once the dry-in is in place, the job is not finished. It just changes from installation to protection.
If the metal panels are not on site yet, limit foot traffic. Every extra walk across the roof adds wear, especially in hot weather when membranes can soften. If workers need to move across the surface, use caution and stay on solid paths.
Keep the roof clear of debris. Nails, scraps, and cutoffs can puncture the temporary layer or block a water path. Clean runoff matters too, so make sure valleys and edges stay open.
If rain is expected during the wait, check the roof again after the storm passes. Look for ponding, lifted corners, torn laps, and wet areas below penetrations. Catching a problem early is a lot easier than finding a stain on the ceiling later.
It also helps to keep good records. Photos of the deck, the barrier, the laps, and the flashings can save time if there's a question later about what was covered and when. In Florida, that kind of paper trail can matter almost as much as the work itself.
Common dry-in mistakes that lead to leaks
Most dry-in failures come from a small set of avoidable mistakes. The roof usually tells you what went wrong, if you know where to look.
- Starting on a wet deck leaves moisture trapped under the barrier.
- Using the wrong fasteners makes the membrane loose or torn.
- Skipping edge metal leaves the most exposed part of the roof unprotected.
- Rushing valleys and penetrations opens the most leak-prone spots.
- Leaving wrinkles in the underlayment creates channels for water.
- Ignoring a loose lap lets wind work on the seam until it fails.
One more issue shows up often on busy jobs, and that's poor timing. If the tear-off happens too early and the panels arrive late, the roof sits exposed longer than planned. A better schedule keeps the dry-in window short and the weather risk low.
The safest path is simple. Repair the deck, install the barrier in order, fasten it correctly, then keep checking it until the metal panels arrive.
Conclusion
A roof dry-in is temporary, but it has to perform under real weather. That means a clean deck, proper laps, solid edge details, and fasteners that match the system.
When those parts line up, the structure stays protected and the final panel install goes smoother. When they do not, the roof becomes vulnerable before the finished metal ever reaches the site.
The strongest dry-in is the one that stays out of the way, holds through the rain, and waits for the next step without calling attention to itself.
Share Our Metal Roofing News Articles
Related Posts