How To Choose The Right Eave Drip Edge For Metal Roofs
If you're installing a metal roof in Florida, the eave edge is where small choices turn into big outcomes. One wrong bend, a short fascia leg, or a drip that misses the gutter, and water starts acting like it owns your roof.
This guide breaks down how to pick the right metal roof drip edge for your panel type, gutter setup, and wind exposure. You'll also get a quick checklist, a comparison table, and a simple way to confirm fit before you order.
What an eave drip edge actually does on a metal roof
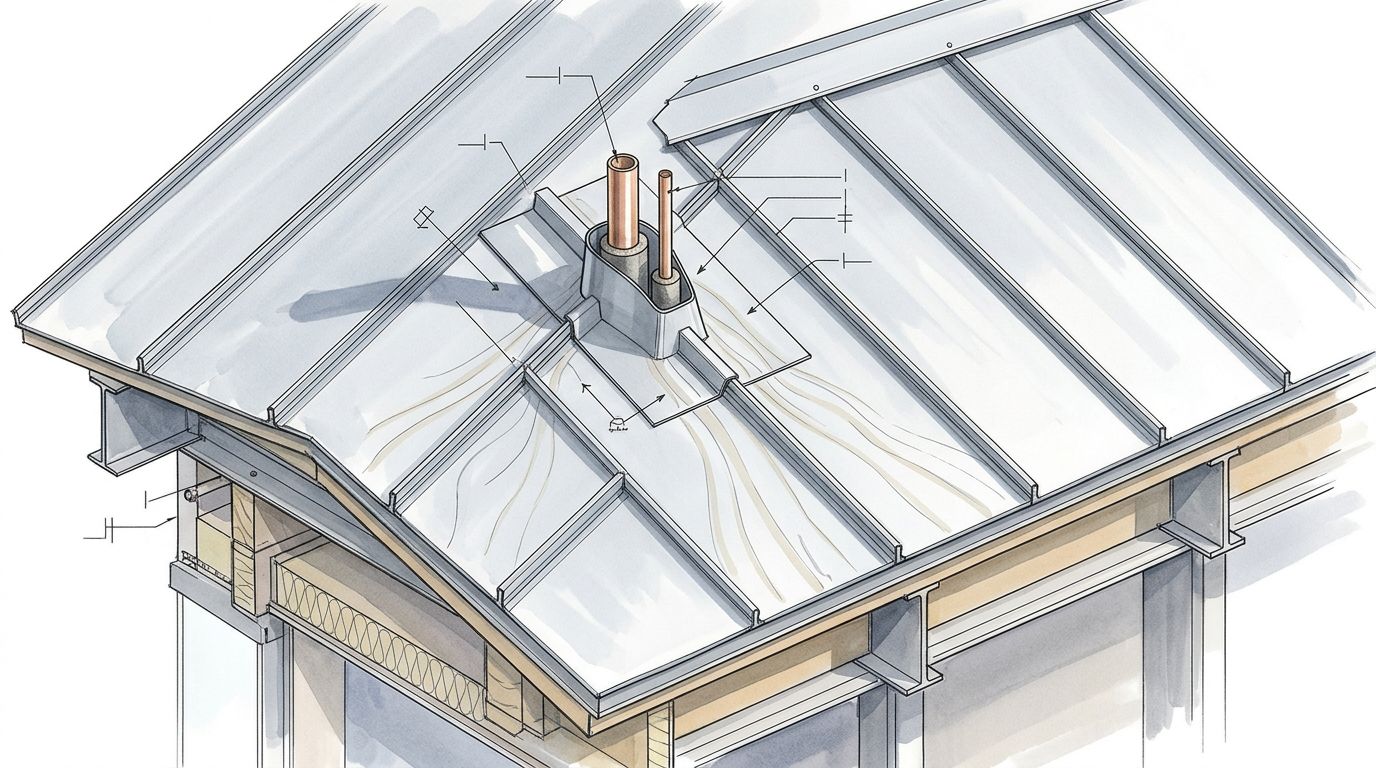
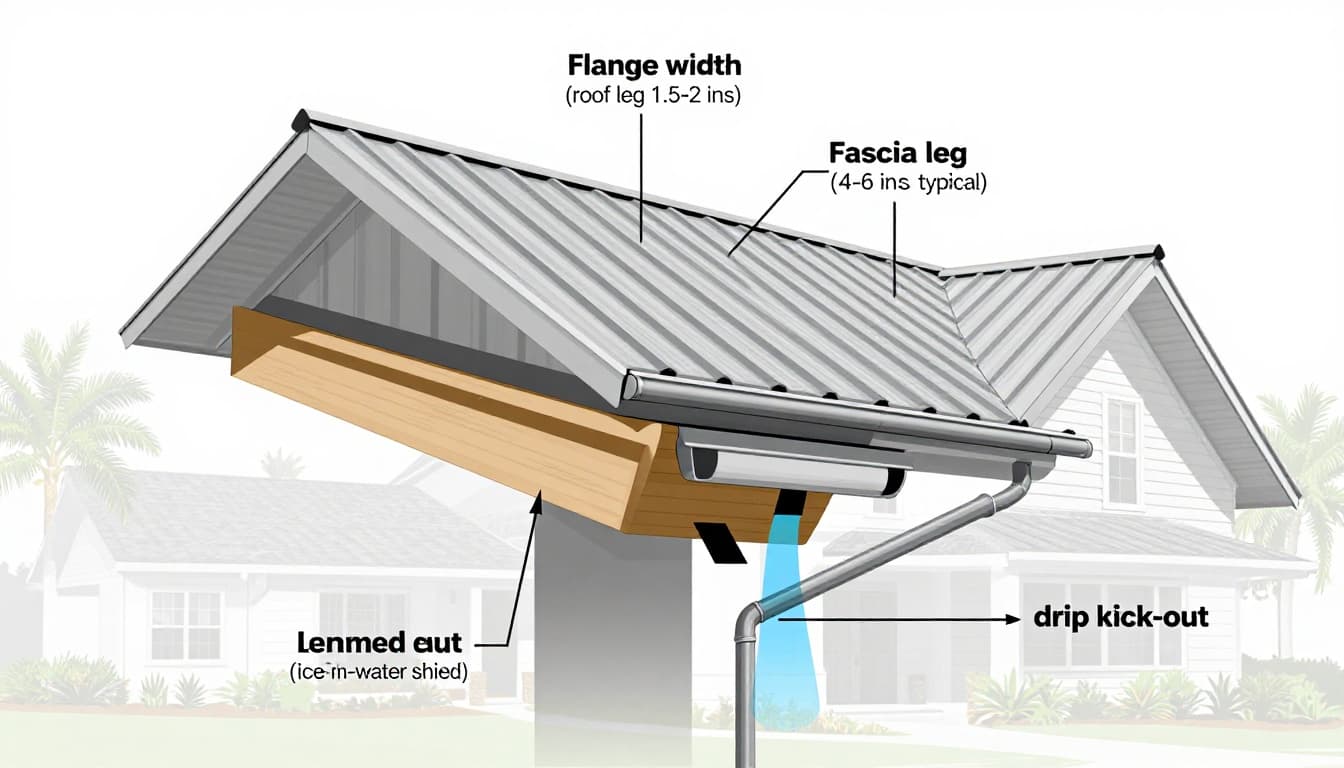 Cross-section view of a metal roof eave edge detail with labeled parts and water flow, created with AI.
Think of drip edge as the "spout" that turns roof runoff into a clean drop into the gutter. On metal roofs, that job gets harder because panels move with heat, Florida rain hits sideways, and wind can push water up under edges.
A good eave drip edge does four things:
- Directs water into the gutter with a drip kick (a small offset that breaks surface tension).
- Protects fascia and roof deck edges from constant wetting.
- Backs up the underlayment edge , so water can't curl back under.
- Adds stiffness at the roof edge , which helps in gusty conditions.
Florida adds two extra pressures: corrosion and wind. Near the coast, you want materials and coatings that won't turn into a rust line. In higher wind zones (including HVHZ counties), edge details need to resist uplift and water intrusion, not just "look finished."
Code language also matters. For context on metal roof accessories and minimum material thickness, see FBC metal roofing accessories requirements. For drip edge placement and fastening spacing language often referenced by inspectors, review Florida code language on drip edges and fastening. Still, the final rule is your local building department plus your panel manufacturer's installation details.
For a quick refresher on trim terms (eave, rake, and more), this internal guide helps: what is roof flashing including eave drip edge.
If the edge detail doesn't force water outward, Florida weather will force water inward.
Choosing the right drip edge profile, material, and thickness
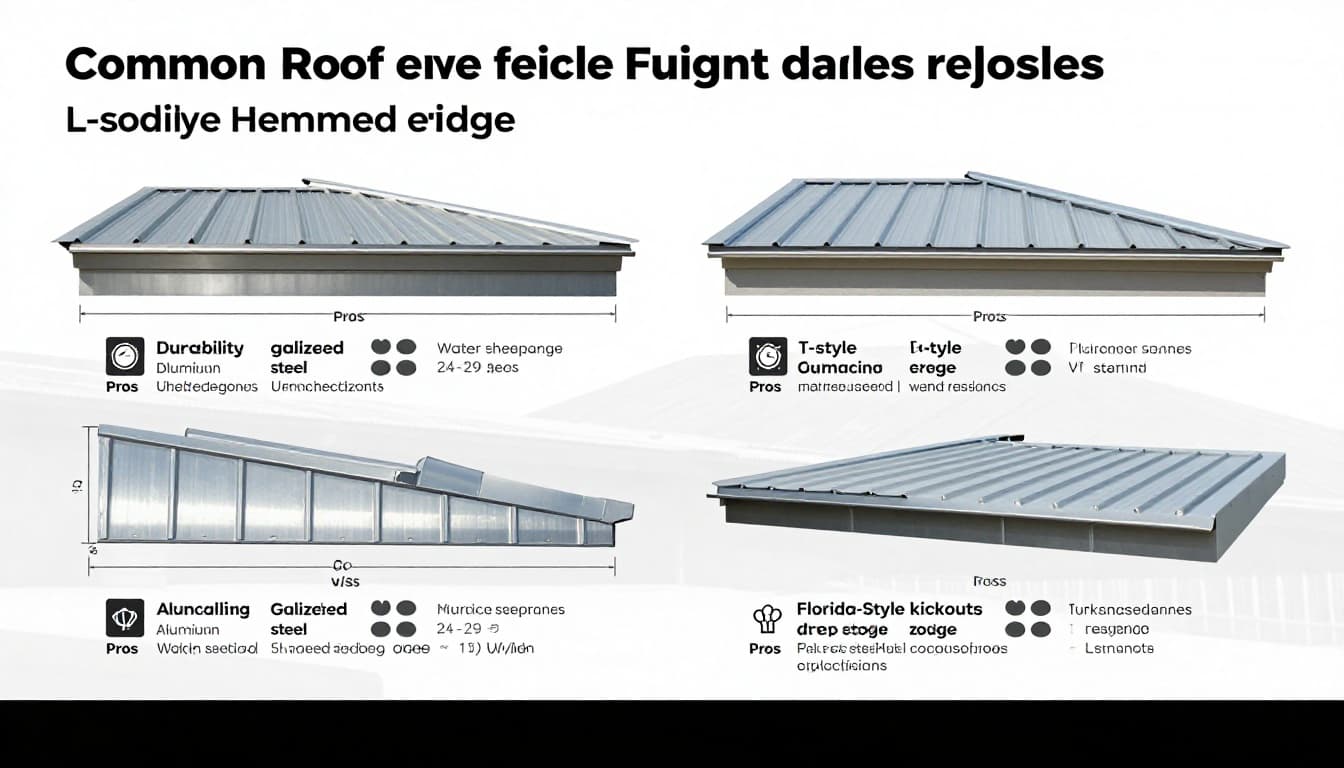 Side-by-side drip edge profile options with practical pros and cons, created with AI.
Start with your panel system, because exposed-fastener panels and standing seam edges don't always use the same eave trim approach. Next, match the drip edge to your gutter geometry and fascia height. Last, pick the metal and thickness that fits Florida exposure.
Before the table, one plain rule helps: use a hemmed edge whenever you can . A hem stiffens the metal, reduces sharp edges, and helps the drip line stay straight.
Here's a contractor-friendly comparison to narrow your options:
| Drip edge option | Profile feel | Common materials | Thickness / gauge target (verify local code) | Best Florida fit |
|---|---|---|---|---|
| L-shape (simple "L") | Basic, light stiffness | Painted steel, galvanized steel, aluminum | Often 26-gauge steel minimum, or aluminum thickness per code | Sheltered eaves, shorter fascia, budget trims |
| T-style (extended roof leg) | More coverage on roof deck | Painted steel, galvanized steel | Thicker steel (often 26 ga or heavier) helps hold shape | Windy sites, longer eave exposure, wide underlayment laps |
| Double-hemmed edge with drip kick | Stiff, clean drip line | Painted steel, aluminum | Choose thicker when runs are long (common upgrade: 24 ga steel) | Better water control into gutters, cleaner fascia lines |
| "Kickout" style eave edge (pronounced drip) | Strong outward throw | Painted steel, galvanized steel | Heavier metal reduces flutter in gusts | Heavy rain, wind-driven rain, tight gutter geometry |
Two selection tips that save call-backs:
- Fascia leg height : Many homes need a 4 to 6-inch fascia leg to cover fascia and hit the gutter zone. If yours is taller, order taller.
- Roof leg width : A 1.5 to 2-inch roof leg is common, but your underlayment and panel details may need more.
Also watch metal compatibility. For example, don't mix dissimilar metals where runoff can carry salts and speed corrosion. When in doubt, match the drip edge material to the panel material and finish.
If you want a "what fails in real storms" viewpoint, this internal post is worth your time: spotting bad metal roof trim at eaves.
Verify fit with your existing gutters and fascia (before ordering)
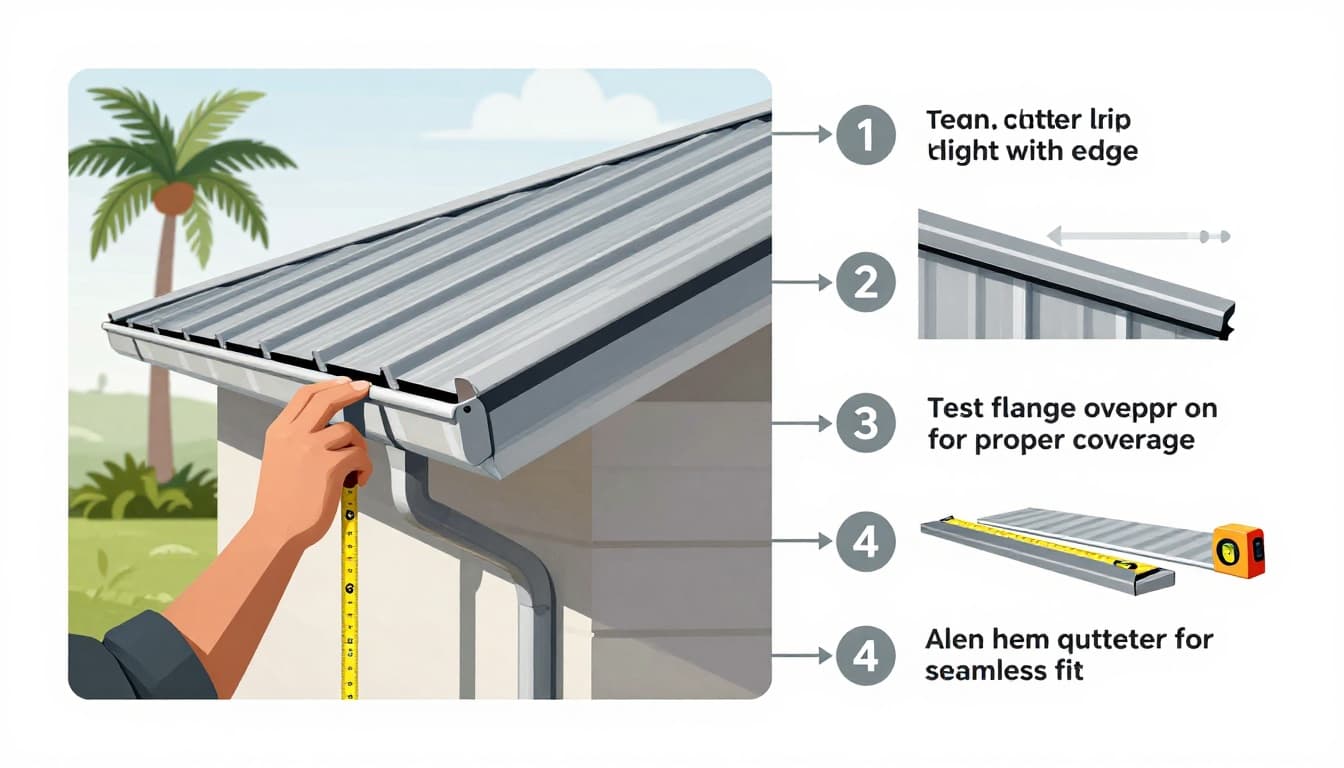 Simple measuring steps to confirm drip edge and gutter alignment, created with AI.
This is where DIY-capable homeowners can outperform "close enough" installs. You're checking one thing: will water leave the drip edge and land inside the gutter during hard rain?
Use this quick step-by-step process:
- Measure fascia height from roof deck top down to the bottom edge.
- Measure gutter position : distance from roof deck to the gutter's back lip (and how far the gutter sits off fascia).
- Check gutter lip height relative to where the drip edge kick will end. You want the drip line inside the gutter, not behind it.
- Mock the profile with cardboard : trace the drip edge shape (roof leg, fascia leg, kick), then hold it in place at the eave.
- Confirm underlayment layering : follow the panel manufacturer's eave detail for whether underlayment goes over or under the drip edge.
- Account for panel overhang : many metal panel details call for a controlled overhang past the drip edge, not a "guess."
- Look for gutter clearance : leave room so debris can wash through, and the edge does not trap leaves.
If your gutter is tucked tight or the fascia is wavy, choose a stiffer, hemmed option. Light-gauge trim can "oil can" and change the drip line.
Quick selection checklist, ordering lengths, and the right accessories
Ordering trim feels simple until you hit inside corners, returns, and long runs. A clean order list prevents field cuts that look rough and leak sooner.
Fast selection checklist (eave drip edge):
- Match the manufacturer's eave detail for your panel profile and slope.
- Choose hemmed edges for stiffness and safer handling.
- Pick a fascia leg height that covers fascia and reaches the gutter zone.
- Use heavier metal for long runs, high winds, and tall fascia.
- Confirm underlayment tie-in at the eave (especially with self-adhered membranes).
- Stay consistent on metal type and finish to reduce corrosion risk.
For ordering, measure total eave length, then add 5 to 10 percent for waste and cuts. Plan lap joints too. Many crews overlap trim pieces a few inches, so you need extra length.
Don't forget accessories that make the edge watertight and sharp-looking:
- Outside corners and inside corners (or mitered corners if your detail allows)
- End caps or "returns" where the eave dies into a rake
- Splice plates (if used) and butyl tape for sealed laps
- Correct fasteners for the substrate (wood vs metal), plus washered fasteners where specified
For a one-stop view of common sealants, closures, and fasteners that show up in edge details, see metal roof accessories like closures and sealants. If you're building a full material list, this planning resource helps you think through trim quantities: drip edges in metal roofing material lists.
Safety notes and when to call a pro
Metal edges are sharp, and Florida roofs can be slick. Call a pro if you have steep pitch , multiple eave transitions , tall fascia with hidden rot , or you're in a high-wind exposure where edge fastening patterns get strict.
If you can't verify the eave detail from the ground with confidence, it's a good time to bring in a licensed roofer.
Conclusion
Choosing the right metal roof drip edge comes down to fit, stiffness, and correct layering with your panel system. Measure your fascia and gutters first, then pick a hemmed, code-appropriate profile that throws water into the gutter during wind-driven rain. Above all, follow the panel manufacturer's details and your local inspector's requirements, because Florida storms don't give "almost right" a second chance.
Share Our Metal Roofing News Articles
Related Posts