
How to Match Replacement Metal Roof Panels to Faded Ones
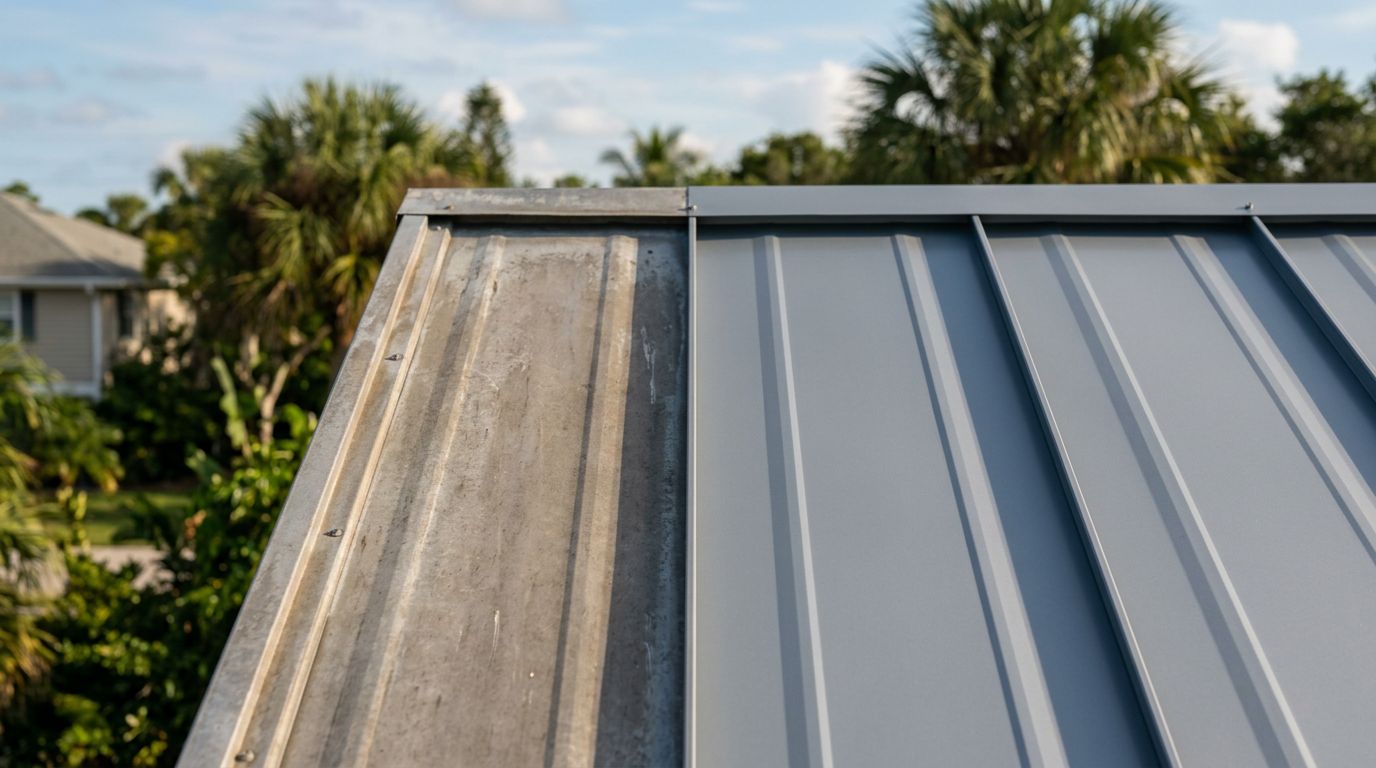
A new panel can protect your roof while still looking out of place if its color, profile, or finish differs from the existing metal. Matching replacement metal roof panels takes more than choosing a color that looks close on a sample card.
Sun exposure, Florida humidity, salt air, rain, and years of dirt change the original coating. The best result comes from identifying the exact panel system first, then comparing color and finish under real lighting. Start with the roof's physical details before placing an order.
Why Faded Metal Panels Rarely Match Exactly
Metal roofing fades because its factory-applied coating changes over time. Ultraviolet exposure can lighten or alter the color, while moisture, airborne dirt, tree debris, and salt may affect the surface. A roof on a south- or west-facing slope often looks different from one on a shaded side of the building.
Even panels installed at the same time may show different color levels. Overhangs, covered porches, and sections near walls receive less sunlight than fully exposed areas. The existing roof may also have chalked, which means the surface has lost some of its original gloss and pigment.
A new panel usually has the original factory color and finish. As a result, it may look darker, brighter, or more reflective than the faded panels around it. That difference often becomes more noticeable when the sun hits the roof at a low angle.
A close color code cannot reverse years of exposure. It identifies the original coating, not the roof's current appearance.
An exact match may be impossible unless you have unused panels from the original production run. Still, you can reduce the contrast by choosing the correct profile, finish, color family, and installation location. A professional can also help decide whether replacing one panel makes sense or whether a larger roof section will produce a cleaner appearance.
Identify the Profile Before Ordering Replacement Metal Roof Panels
Color should come after panel identification. A panel that matches the color but has the wrong shape can create alignment problems, exposed gaps, or failed side laps.
Begin by determining the panel style. Common systems in Florida include exposed-fastener AG or Multi-Rib panels, PBR panels, 5V panels, and standing seam systems. Each design has different rib spacing, seam construction, fastening methods, and trim requirements.
Measure a sound section rather than relying on memory. Record the following details:
- Measure the rib spacing and panel coverage width.
- Note the rib height, shape, and spacing.
- Check the panel length and whether it has an end lap.
- Identify exposed screws or concealed clips.
- Record the metal thickness if you can find it on the original documentation.
- Inspect the eave, rake, ridge, valley, and wall flashing details.
Look for the original invoice, building plans, installation paperwork, or leftover material stored on the property. A color name alone won't confirm the panel profile. Likewise, a photograph may help narrow the options, but it cannot replace measurements.
Standing seam panels require extra care because the seams, clips, lock dimensions, and panel widths must work together. A replacement section from a different standing seam system may not lock into the existing panels, even if the seam looks similar.
When the profile, flashing, or fastener layout is uncertain, contact a qualified roofing professional before ordering. The step-by-step panel replacement guide can help you review the basic process, but the original manufacturer's specifications should control the final selection.
Compare the Existing Color in Natural Light
Once you know the profile, compare the existing roof with current color samples. Do this on a dry day, preferably in the morning or late afternoon. Harsh midday sun can make a coating look lighter and more reflective than it appears under normal conditions.
Clean a small area of the existing panel first. Use plain water and a soft brush or cloth. Avoid aggressive pressure washing, abrasive pads, or strong chemicals that could change the surface. Dirt can make a gray panel look brown, while chalking can make a dark finish appear pale.
Hold the sample against several roof locations. Check the new color beside a sun-exposed panel, a shaded panel, and the section nearest the repair. Pay attention to the undertone, such as blue, green, brown, or red. Two colors can seem similar from a distance yet clash when placed side by side.
Gloss also affects the match. A low-gloss or matte finish may blend better with an aged roof than a high-gloss product in the same color. However, finish names vary by manufacturer, so compare samples from the same product line whenever possible.
A small piece of the existing panel is more useful than a phone photograph. If removal is impractical, ask a supplier or roofer to inspect the roof in person. Provide the building location, roof age if known, panel style, and any original color information.
Replacement metal roof panels should match the original coating system when possible. Mixing different paint systems can create a visible difference in sheen and may affect long-term performance. Ask about the finish type, coating warranty, and Florida product approval for the proposed panel.
Choose the Repair Location to Reduce Contrast
The location of the new panel affects how visible the mismatch will be. A single bright panel in the center of a front-facing roof slope usually attracts more attention than one near an edge or behind a roof feature.
If the roof design allows it, place the replacement in a less prominent area. A roofer may be able to move matching panels from a hidden section and install new material where the color difference is easier to accept. This approach requires careful planning because every moved panel must remain compatible with the existing laps, fasteners, and weather seals.
Replacing a full panel from eave to ridge often looks better than installing a small patch. Many metal roofs rely on continuous ribs and properly overlapped joints. Cutting a panel across its width can introduce extra seams, more fasteners, and additional points for water entry.
For a roof with several damaged panels, replacing a complete roof plane may create a more uniform appearance. That decision depends on the roof's age, corrosion level, remaining service condition, and budget. Review the repair-versus-replacement signs before treating a widespread problem as a one-panel fix.
Don't expect new material to blend immediately. Weather will gradually change the replacement panel, but the rate depends on orientation, coating, climate, and exposure. The old and new areas may remain visibly different for years.
Avoid painting the entire panel with an unapproved product to hide the contrast. Household paint may peel, chalk, or interfere with the original coating. Use only manufacturer-approved touch-up products for small cut edges, scratches, or exposed fastener areas.
Install the New Panel Without Creating a Leak
A good color match cannot compensate for an installation mistake. Before work begins, check the underlayment, purlins or deck, surrounding trim, and fastener holes. Water damage may extend beyond the panel that first showed a leak.
Exposed-fastener systems require the correct screw length, washer type, placement, and spacing. Fasteners should enter the intended structural support without crushing the panel or leaving the washer loose. Old holes may be enlarged, misaligned, or weakened, so reusing them without inspection can create a leak path.
Standing seam systems require the correct clips and seam engagement. Never force a new panel into an existing seam if the lock dimensions differ. A distorted seam may appear closed while still allowing wind-driven rain beneath the joint.
Laps need clean surfaces and compatible sealant. Remove loose debris and failed sealant without damaging the coating. Follow the panel manufacturer's instructions for lap direction, sealant location, trim overlap, and closure materials. Florida storms place added pressure on roof edges, penetrations, and exposed fasteners.
The repair should also preserve water flow. Check that the panel sits flat, ribs align, and nearby flashing directs water away from the joint. A panel that rocks, has a twisted end, or leaves a gap at the lap needs correction before it is fastened.
A panel can have the right color and still be the wrong replacement if its ribs, lap dimensions, or seam lock don't match the roof.
If you find bent ribs, a sharp crease, cracked coating, or a damaged locking edge, don't install the panel. Minor cosmetic damage on a flat area may have a limited repair option, but a distorted edge or seam can prevent proper weatherproofing. A qualified roofer should inspect uncertain damage before installation.
Know When One Panel Isn't the Right Repair
One replacement makes sense when the surrounding roof is sound and the damage is isolated. Rusted fasteners, a puncture, storm damage, or a single badly dented panel may qualify for targeted work.
A broader repair deserves closer inspection when you see corrosion across several panels, repeated leaks, warped ribs, failing trim, or widespread coating loss. The roof may have an installation problem or water damage beneath the visible panel. Replacing one section without addressing the cause can lead to another repair soon.
Roof age also matters. If the existing panels and fasteners are near the end of their useful condition, a new panel may highlight the roof's overall wear without solving it. A roofing professional can check the deck, underlayment, framing, fasteners, and drainage before recommending a repair plan.
Conclusion
Matching replacement metal roof panels starts with the profile, not the paint color. Confirm the rib pattern, coverage, seam design, thickness, fastening method, and flashing details before comparing finishes.
Natural-light samples, a clean section of the existing roof, and the original product information can reduce visible differences. Still, an exact match on faded panels isn't realistic in many cases. When weatherproofing, coating compatibility, or installation details are uncertain, qualified professional guidance protects both the appearance and performance of the repair.
Share Our Metal Roofing News Articles
Related Posts




