
How to Install Parapet Scupper Flashing on Metal Roofs
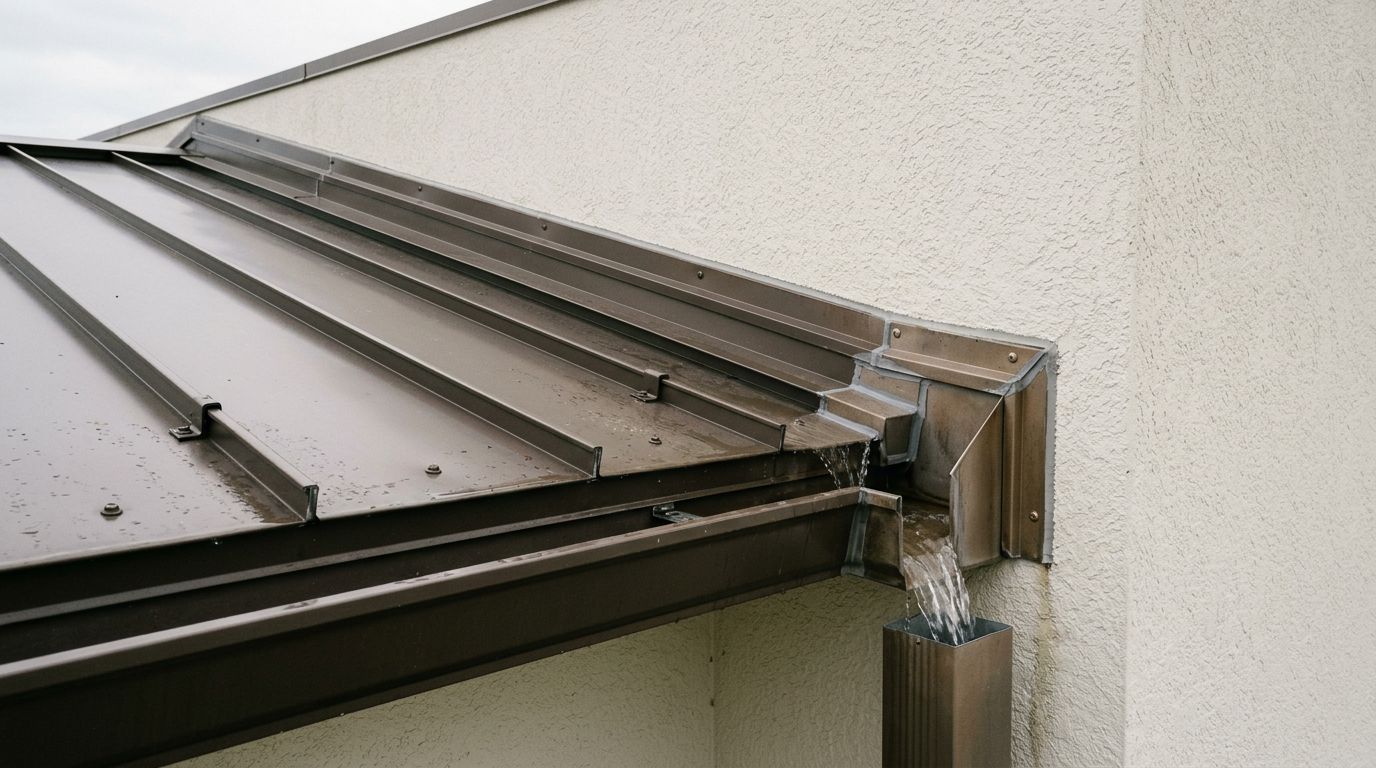
A parapet scupper gives roof water a controlled exit, but one poorly sealed corner can send rain behind the wall or under the panels. Parapet scupper flashing must direct water through the opening while allowing the metal roof, wall, and parapet cap to move independently.
The correct detail depends on the roof profile, scupper size, wall construction, drainage design, and Florida code requirements. Use this guide as a practical framework, but follow the metal-roof manufacturer's instructions, approved drawings, and local building codes first.
Key Takeaways
- Plan the scupper opening, slope, drainage capacity, and flashing sequence before cutting metal.
- Install a formed scupper box or liner with properly shingled laps and positive drainage.
- Keep panel ends, fasteners, sealants, and dissimilar metals compatible with the roof system.
- Allow for thermal movement instead of locking long flashing pieces in place.
- Test the finished detail with controlled water and inspect it after severe Florida weather.
What Parapet Scupper Flashing Does
A scupper is an opening through a parapet wall that carries water from the roof to the outside. Some scuppers discharge directly through the wall, while others connect to a conductor head and downspout. The opening may include a metal box, liner, throat, or welded pan that protects the wall assembly.
The flashing has several jobs. It must collect water from the roof surface, guide that water through the wall, protect the opening edges, and keep wind-driven rain from entering the roof or wall system. Every part must work as one drainage path.
The roof panels usually stop at the parapet. They should not be forced into the scupper opening or cut so tightly that expansion pushes against the wall. A separate metal transition carries water from the panel field to the scupper assembly.
Common components include:
- A scupper box or formed liner
- Roof-side back and side flanges
- A sill or bottom flange that slopes toward the outlet
- Head flashing above the opening
- Side flashing at the jambs
- Counterflashing or a parapet cap connection
- Cleats, clips, fasteners, and approved sealants
The flashing profile must match the panel geometry and wall detail. Review available metal flashing profiles before ordering material, especially when the project needs custom trim or an unusual scupper size.
A watertight scupper depends more on the order of the laps than on the amount of sealant applied.
Plan the Opening and Drainage Path
Before installation, confirm the scupper location against the roof plan. Check the roof slope, low points, drains, overflow outlets, parapet height, and any structural framing behind the wall. The scupper must sit where water can reach it without ponding against an obstruction.
Drainage capacity also matters. A scupper opening that is too small can back water onto the roof during a heavy storm. Florida projects may require separate emergency overflow drainage, depending on the building design and code review. The architect, engineer, or responsible contractor should establish the opening size and elevation.
Inspect the wall assembly before cutting. Identify masonry, sheathing, framing, insulation, membrane, counterflashing, and interior finishes. A scupper that passes through a framed parapet needs different support and sealing from one installed through solid masonry.
Take field measurements rather than relying only on drawings. Confirm:
- The clear opening width and height
- The wall thickness
- The roof panel profile and rib spacing
- The distance from the panel ends to the wall
- The location of parapet framing
- The required slope through the scupper
- The direction of every overlapping piece
Prepare a full-size layout for the metal pieces. Mark the opening, flange widths, bend lines, fastener zones, and lap locations. This step prevents a common mistake, cutting the roof panels before the scupper box and side flashing are ready.
Prepare Compatible Materials and Tools
Use metal that matches the roof system or has written approval for use with it. Galvanized steel, Galvalume-coated steel, aluminum, copper, and stainless steel don't all belong in direct contact. Dissimilar metals can cause galvanic corrosion, especially where Florida humidity and salt air remain present.
Choose fasteners with corrosion resistance suitable for the roof environment. Use the fastener type, spacing, and washer requirements listed by the roof manufacturer. Screws should not be so long that they puncture concealed drainage surfaces or interfere with the scupper box.
Sealants also need to match the coating and substrate. Butyl tape or non-skinning butyl sealant is often used beneath concealed laps, while an exposed sealant must be approved for the metal finish, ultraviolet exposure, and expected movement. Sealant can't replace a properly formed lap or a positive drainage slope.
Typical tools include metal snips, a hand seamer, a portable brake, a drill with controlled torque, a chalk line, a tape measure, a level, a rivet tool if specified, and cleaning cloths. Remove metal filings after cutting. Loose filings can rust and stain the coating.
Wear cut-resistant gloves, eye protection, long sleeves, and appropriate footwear. Use fall protection required for the roof height and site conditions. Keep cords and tools secured, and don't work on wet panels, during lightning, or in high winds. Never use an open flame near sealants, membranes, insulation, or combustible wall components.
How to Install Parapet Scupper Flashing
The following sequence covers a typical formed-metal scupper at a low-slope or sloped metal roof. The project drawings and manufacturer details take precedence if they specify another order.
- Set out the scupper opening. Mark the approved opening on the parapet and confirm that its bottom elevation allows water to drain from the roof. Keep the layout square and leave the required clearance for the scupper box, sealants, and movement.
- Cut and reinforce the wall opening. Cut masonry, sheathing, or metal framing according to the approved construction detail. Install required framing, blocking, or edge support around the opening. Don't remove structural members without direction from the responsible designer.
- Prepare the roof-side transition. Extend the roof underlayment, membrane, or approved waterproofing into the scupper zone as shown in the assembly detail. Clean the substrate and repair tears, gaps, or exposed voids before installing metal.
- Install the scupper box or liner. Fit the formed box through the parapet with the outlet sloping toward the exterior. The roof-side flange should extend far enough onto the roof to connect with the water-shedding layer. Fasten it without distorting the metal, and use sealant beneath concealed joints where specified.
- Install the lower flashing first. Place the sill, pan, or bottom transition so water flows into the scupper without a reverse bend. The lower piece should discharge into the box, not behind it. Seal and fasten the joint according to the approved detail.
- Add the side flashing. Install the left and right jamb pieces over or into the scupper box flanges. Keep the side laps directed toward the outlet. Fold corners neatly, and avoid cuts that leave an open path behind the flashing.
- Install the head flashing. Place the upper piece so water from the parapet face or roof-side wall transition sheds over the side pieces. The head flashing must not create a pocket where water can sit. Use a cleat or receiver when the detail calls for one.
- Tie in the roof panels. Cut panels to stop cleanly before the parapet and scupper assembly. Don't notch ribs without a panel-specific detail. Install closure materials, end treatment, and panel fasteners as directed, while keeping the panel edge from blocking the drainage path.
- Connect the parapet cap and counterflashing. The cap should shed water away from the wall and protect the top edge of the scupper flashing. Counterflashing should secure the upper flashing without trapping water or preventing thermal movement.
- Seal, clean, and inspect. Tool exposed sealant to a continuous finish where required. Remove filings, excess sealant, protective film, and sharp burrs. Check every corner, fastener, lap, and transition before testing the assembly.
Correct Laps, Fasteners, and Movement
Water should always travel over a lap, never into one. Lower pieces go in first, followed by side pieces, then upper pieces. If a lap must run across the drainage direction, use the width and sealant specified by the roof-system manufacturer.
Avoid placing fasteners where they can puncture the back of a concealed pan. Overdriven screws can crush washers and deform the metal. Underdriven screws can leave a loose joint that moves in wind. Set the driver properly and replace damaged washers.
Metal expands and contracts with temperature. Long flashing runs, parapet caps, and wall transitions need clips, slotted holes, end clearances, or expansion joints when required by the design. Don't use exposed fasteners to lock every piece tightly against the wall.
A small scupper may use a compact formed detail, while a wider opening may need multiple pieces, a support angle, or a conductor head. The assembly must remain stable under wind and must not rely on a bead of caulk to hold the metal in position.
Test the Finished Scupper
Inspect the detail from both sides of the parapet. Look for gaps at corners, uphill-facing seams, loose fasteners, blocked outlets, and areas where the flashing touches the wall without a movement allowance. Confirm that the outlet has a clear path and that the bottom metal slopes outward.
Run a controlled hose test after the sealants have cured according to their product instructions. Start above the scupper and use a moderate flow. Don't aim a high-pressure stream directly into a lap or seam, because that can force water through a detail that normal rainfall wouldn't challenge.
Check the roof-side area first, then inspect the wall interior, underside, conductor head, and discharge point. Water should leave through the opening without appearing behind the flashing. If leakage occurs, stop the test and trace the path uphill. Adding surface caulk over a leaking lap often hides the problem for a short time.
After the first major rain, inspect the scupper again. Florida wind can move loose trim, while airborne debris can block the outlet. Clear leaves and sediment without scraping the coating or bending the sill.
Conclusion
A dependable scupper begins with a correctly sized opening and ends with a continuous drainage path. Install the box, sill, sides, head flashing, panels, and parapet cap in the correct order, with compatible materials and room for movement.
The strongest protection comes from parapet scupper flashing that sheds water through formed metal and properly lapped joints. When the detail involves structural changes, emergency drainage, or an unfamiliar roof assembly, use the approved project drawings and manufacturer instructions rather than improvising on the roof.
Share Our Metal Roofing News Articles
Related Posts




