
How to Flash Metal Roof Panels at Curved Walls
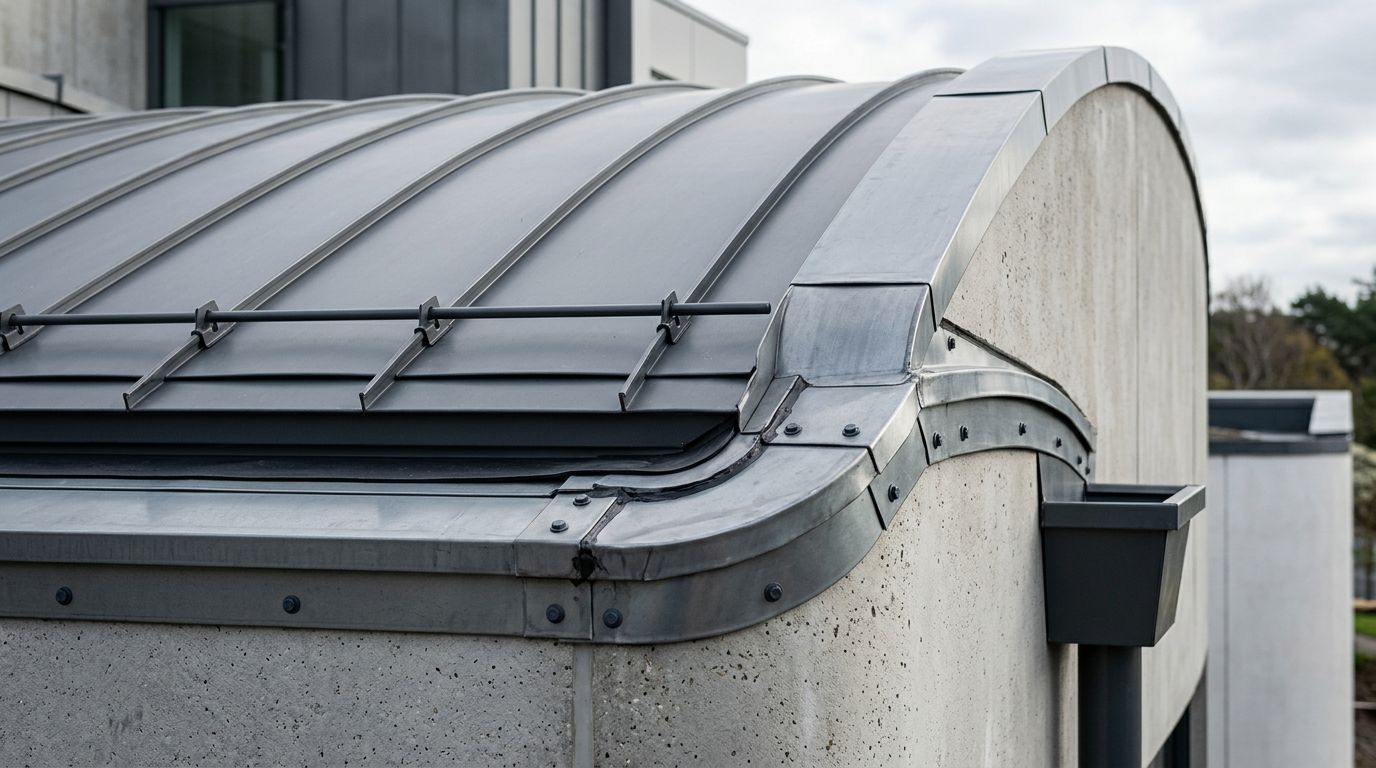
A curved wall can turn a routine roof edge into a leak-prone transition. Straight flashing may leave gaps, buckle against the wall, or force water behind the panels.
To flash metal roof panels correctly, you need a detail that matches the wall radius, panel profile, roof slope, drainage direction, and wall cladding. The right assembly may use curved trim, segmented flashing, or a custom-fabricated transition.
Key Takeaways
- Determine whether the connection needs sidewall or endwall flashing based on water flow.
- Match the flashing to the roof panel profile and the curve of the wall.
- Use properly formed closures, compatible sealants, and manufacturer-approved fasteners.
- Avoid forcing straight trim onto a curved surface or relying on caulk to fill large gaps.
- Consult a qualified roofing professional for compound curves, low-slope roofs, and warranty-sensitive work.
Start With the Wall and Panel Profile
Curved walls come in several forms. A wall may have a simple convex curve, a concave curve, or a compound curve that changes direction across the roof edge. Each shape affects the trim design.
The roof panel profile also matters. AG or Multi-Rib panels, PBR panels, 5V panels, and standing seam systems have different ribs, seams, closures, and fastening methods. A flashing piece that fits a 5V panel won't automatically fit a PBR panel.
Begin by identifying these project details:
- The panel profile and material thickness
- The wall's radius or changing curve
- The roof slope and direction of drainage
- The wall cladding, such as metal panels, stucco, masonry, or siding
- The location of laps, seams, penetrations, and structural supports
- The manufacturer's approved trim and installation requirements
If the roof drains toward the wall, the connection usually needs an endwall or headwall flashing detail. When the wall runs along the sloped edge of the roof, a sidewall detail may apply. A curved wall can combine both conditions, so don't choose trim by appearance alone.
Measure the curve at the actual roof plane. A wall's radius at the foundation may differ from its radius near the roof. Record the high and low points, the arc length, and the distance between panel ribs. A full-size template made from cardboard or thin sheet metal can reveal fit problems before you cut expensive trim.
The correct flashing detail follows the water path, not the shape of the wall alone.
Plan the Roof-to-Wall Transition
Flashing must move water from the wall face onto the roof surface without trapping it behind the metal panels. That requires a continuous drainage path and well-planned laps.
For a metal-clad wall, the upper portion of the flashing typically integrates behind the wall panel or behind the wall's water-resistive layer. The lower portion extends over the roof panel and directs water downslope. The exact order depends on the wall assembly and the manufacturer's details.
Masonry and stucco walls need a different approach. The flashing may connect to a counterflashing, reglet, surface-mounted receiver, or other approved termination. Do not cut into masonry or stucco without confirming the required detail.
A curved transition often uses one of three approaches:
- Factory-formed or custom-curved flashing follows the wall in a continuous piece.
- Segmented flashing uses short sections shaped to the curve, with overlapping joints.
- A combination detail uses curved trim at the main arc and separate pieces at corners or changes in direction.
A simple curve may accept segmented trim. However, each joint creates another place for water to enter. Use the overlap direction to shed water, and place joints away from low points when the design allows.
Allow for thermal movement as well. Metal expands and contracts with temperature changes, which can stress long flashing runs and sealed joints. Follow the system's recommended fastener spacing, lap length, and movement provisions instead of choosing dimensions by guesswork.
For Florida projects, also review the required product approvals, wind requirements, and installation documents before ordering materials. A roof detail that works on a sheltered agricultural building may not meet the requirements of a residential or commercial structure.
How to Flash Metal Roof Panels at a Curved Wall
The installation sequence varies by roofing system, but the following process provides a sound planning framework.
1. Establish the flashing line
Snap or mark the intended water-shedding line along the roof-to-wall junction. The line should remain consistent with the roof slope and should not dip into a drainage path.
Next, check the roof framing and panel layout. A panel rib, seam, or fastener line may fall directly beneath the proposed flashing. Adjust the panel layout when possible, or use a trim profile designed for that condition.
Mark where the wall cladding, underlayment, and existing trim must be removed. Flashing that stops against an outer wall surface may look complete while leaving the water-resistive layer unprotected behind it.
2. Make a template before forming the metal
Create a template that follows the curve at the roof plane. Transfer the template to the trim material or send accurate measurements to a metal fabricator.
The flashing needs enough width to cover the wall connection and extend across the roof panel. However, excessive width can create a loose edge that bends in the wind. The bend angle must also match the roof slope rather than the wall's vertical face alone.
For a segmented detail, divide the curve into manageable sections. Shorter pieces conform more easily, but they create more laps. Keep each piece aligned with the next one, and avoid abrupt changes that could collect water.
3. Fit the upper wall leg
Place the upper leg behind the wall panel or into the approved wall-flashing location. Keep the top edge protected from direct water entry.
When wall panels are installed vertically, the flashing may need to fit around ribs or panel sidelaps. When the wall uses horizontal siding, the flashing must coordinate with the siding laps. Never cover a drainage opening or place the flashing where water cannot escape.
If the curve changes in two directions, stop and reassess the assembly. A flat piece of trim may wrinkle or pull away from the wall as you fasten it. Compound curves often require shop-fabricated trim and field verification by an experienced installer.
4. Fit the lower roof leg
Set the lower leg over the roof panels according to the approved panel detail. The metal should maintain contact with the intended sealing surfaces without pressing so hard that it distorts the panel ribs.
Use closure strips where the panel profile leaves openings beneath the flashing. Closures should match the panel shape and should not block the path that carries water downslope. For standing seam roofs, use the manufacturer's transition components rather than drilling through the seam or clamping unrelated trim to it.
Cutting around ribs requires care. Use snips or a nibbler suited to the panel metal, and remove sharp burrs before installation. Avoid abrasive saws when they can leave hot metal particles on the coating.
5. Install laps and fasteners
Install each flashing section so the upper piece overlaps the lower piece in the direction of water flow. Apply the approved butyl tape or sealant at the lap, then fasten the joint as specified.
Use gasketed metal-roofing screws or other approved fasteners for the selected system. Drive screws straight and stop when the washer seats. Overdriving can damage the washer and distort the flashing, while underdriving can leave a leak path.
Do not depend on stitch screws or exposed sealant to hold a large flashing piece against wind loads. The substrate must provide secure attachment, and the fastener layout should follow the engineering or manufacturer's requirements.
6. Seal, inspect, and protect the finish
Seal cut edges, corners, and laps with a compatible product where the installation detail calls for it. Butyl tape works well beneath many concealed laps, while exposed sealants need compatibility with the panel coating and local weather conditions.
Inspect the finished curve from several angles. Look for open corners, oil-canning that prevents contact, loose fasteners, blocked closures, and sealant squeezed completely out of a joint.
After the sealant reaches the required cure, test the area with controlled water flowing down the wall and across the roof. Avoid spraying upward under the flashing. If water enters during testing, correct the assembly before the wall cladding or interior finishes conceal the problem.
Select Compatible Trim, Closures, and Sealants
Custom trim is often the cleanest solution for a curved wall because it reduces the number of joints. The trim shop needs the panel profile, roof pitch, wall radius, material, finish, and desired leg dimensions.
Mid Florida Metal Roofing Supply offers metal roof flashing profiles that include sidewall, headwall, transition, rake, and other trim styles. Use the available profiles as a starting point, then confirm whether the project needs a standard piece, modified trim, or custom fabrication.
Closures must match the exact panel shape. Foam closures with the wrong rib spacing can leave gaps or compress unevenly. Vented and solid closures also have different uses, so follow the roofing system's installation instructions.
Sealant selection depends on the coated metal, substrate, exposure, and joint location. Use products approved by the panel manufacturer. Some sealants can stain finishes, interfere with paint adhesion, or lose flexibility under Florida heat and ultraviolet exposure.
Keep dissimilar metals separated when the combination could cause corrosion. Stainless steel, aluminum, galvanized steel, and painted steel may require compatible fasteners or isolation materials. A material supplier or roofing professional can verify the combination before installation.
Mistakes That Cause Leaks at Curved Walls
The most common error is installing straight flashing and forcing it to follow the curve. That approach creates wrinkles, lifted edges, and uneven pressure at the laps.
Other problems include:
- Choosing sidewall trim when the roof actually drains into an endwall
- Cutting away panel ribs without installing a matching closure
- Placing flashing on top of the wall cladding when it needs to integrate behind it
- Using short butt joints instead of properly overlapped laps
- Leaving cut edges exposed to constant moisture
- Overdriving screws through the flashing or panel
- Blocking weep paths at the base of wall panels
- Sealing the bottom edge so tightly that water cannot drain
- Mixing metals, fasteners, or sealants without checking compatibility
- Installing over a damp, dirty, or unstable substrate
A low-slope roof deserves extra caution because water drains more slowly and small defects remain wet longer. Curved transitions with valleys, parapets, skylights, or multiple wall materials also need a project-specific drawing.
Know When to Call a Roofing Professional
A qualified roofing professional should handle the work when the curve is compound, the roof has a low slope, or the wall connection affects the building envelope. Professional help is also appropriate when the project requires custom-bent trim, structural attachment, counterflashing, or removal of existing wall cladding.
Warranty-sensitive installations need special care. Some manufacturers require approved accessories, specific sealants, or documented installation methods. Changing the detail without approval can create both leak risk and warranty problems.
Roof work also carries fall hazards. Use proper access equipment, fall protection, gloves, eye protection, and safe handling methods for sharp metal. Never work on wet panels, during lightning, or in high winds.
Conclusion
Curved walls require more than bending a straight piece of trim into place. The flashing must follow the drainage direction, match the panel profile, integrate with the wall assembly, and allow the metal to move without opening the joints.
A careful template, compatible closures, correctly overlapped trim, and manufacturer-approved materials create a dependable transition. When the curve, slope, or wall system is difficult to verify, bring in a qualified roofing professional before cutting panels. The strongest flashing detail is the one that guides every drop of water downslope without depending on sealant alone.
Share Our Metal Roofing News Articles
Related Posts




