5V Crimp Fastener Placement Guide for Florida Roofs
A 5V crimp roof can look simple, yet the 5V crimp fastener placement plan is where Florida jobs are won or lost. On a calm day, almost any screw pattern seems fine. When wind pushes and pulls at the corners, those "almost" details show up fast.
The bottom line is this: Florida doesn't allow a one-size-fits-all fastener spacing for 5V panels. Your spacing and placement must match the exact product's Florida Product Approval or Miami-Dade NOA, plus the manufacturer installation instructions used in that approval.
If you're a roofer, GC, inspector, or homeowner comparing quotes, this guide shows how to choose the correct pattern without guessing.
Start with the approval documents (because spacing is tested, not assumed)
Fastener spacing for 5V crimp panels in Florida is tied to wind uplift testing and code compliance. That information lives in one of two places:
- Florida Product Approval (FPA) for most of Florida
- Miami-Dade NOA when the job is in, or required by, HVHZ rules or local AHJ policy
Even outside HVHZ, many crews still use an NOA if it matches the product and meets the project needs. What matters is that the approval matches the panel profile, metal type and thickness, substrate, and fastener type.
Before you touch a screw gun, confirm these items on the paperwork:
- The panel system name and profile is the same as the quote.
- The approval covers your deck type (plywood, OSB, purlins, metal deck) and attachment method.
- The approval includes a fastener schedule (often broken out by field, edge, corner).
- The manufacturer's installation instructions referenced by the approval are available to the crew.
If you need a quick refresher on what makes this profile different from other exposed-fastener panels, start with this overview of fastening techniques for 5V metal panels.
One more practical point for bid reviews: two contractors can sell "5V crimp," yet quote different fastener spacing. The tighter pattern might be required by the approval for your wind zone, height, and exposure. Or it might be padding. The paperwork tells you which.
If a bidder can't produce the Florida Product Approval or NOA fastener schedule for the exact panel system, you're not looking at a complete roofing plan yet.
Know your roof zones first: field, edge, corner (plus eave, rake, ridge)
Approvals don't just say "screw it every X inches." They assign spacing by roof zone , because wind loads climb at the perimeter and spike at corners.
Use these plain-language definitions when reading a schedule:
| Term | What it means on the roof | Why it changes fastener spacing |
|---|---|---|
| Field | The main interior area of the roof | Lowest uplift compared to perimeter |
| Edge | Perimeter bands along roof edges (often excluding corner boxes) | Higher suction near the perimeter |
| Corner | The corner regions where two edges meet | Highest uplift on most roofs |
| Eave | Bottom edge where water sheds into gutter | Perimeter zone, often treated like "edge" |
| Rake | Gable edge sloping up to ridge | Perimeter zone, often treated like "edge" |
| Ridge | Peak line where two roof planes meet | Attachment depends on ridge cap system |
Where do the zone dimensions come from? In many cases, they trace back to ASCE 7 wind zoning methods adopted by the Florida Building Code, then the product approval converts that into tested spacing limits. The approval might show corner and edge dimensions in a diagram, or it may point to a calculation method.
For installers, the key is consistency. Layout lines help, because "corner zone" is a box you can measure and snap. For homeowners, the key is asking for clarity. A good proposal should call out field, edge, and corner spacing, not just "per manufacturer."
Step-by-step: how to select the correct fastener spacing from your NOA or Florida Product Approval
The safest way to pick fastener spacing is to work from required wind pressure back to an approved assembly. That keeps the job aligned with code, warranty, and inspection.
1) Identify where the roof is regulated (HVHZ vs non-HVHZ)
Miami-Dade and Broward have extra requirements in many cases. Even outside those counties, a coastal AHJ may ask for an NOA-based system on certain buildings. Confirm early so you don't order the wrong package.
2) Gather the project wind inputs
You do not need to guess these. They come from the plans, the permit set, or an engineer of record when required.
Common inputs include mean roof height, exposure category, roof slope, enclosed or partially enclosed classification, and design wind speed. Without these, you can't verify design pressures.
3) Pull the exact approval document for the panel system
Use the Florida Product Approval number or the Miami-Dade NOA number provided by the supplier or contractor. Confirm the model matches your panel profile and gauge.
4) Find the "pressures and fastening" pages
Most approvals include tables that connect:
- Zone pressures (field, edge, corner), and
- Attachment options (fastener type, spacing, substrate details)
This is where you will see different allowable spacings for different conditions. Two assemblies in the same approval can have very different screw patterns.
To keep it clean, use this quick checklist while you read the schedule:
| You must match | Where it shows up |
|---|---|
| Panel thickness and material | Scope or system description |
| Substrate type and thickness | Assembly description |
| Fastener type, diameter, length, washer | Fastener schedule notes |
| Fastener spacing by zone | Field, edge, corner tables/diagrams |
| Sidelap or stitch fastening (if required) | Notes and details sheets |
5) Translate the schedule into a roof-ready layout
Once you pick the approved assembly option, turn it into something the crew can install and the inspector can verify. Mark zone boundaries, then note the on-center spacing for each zone.
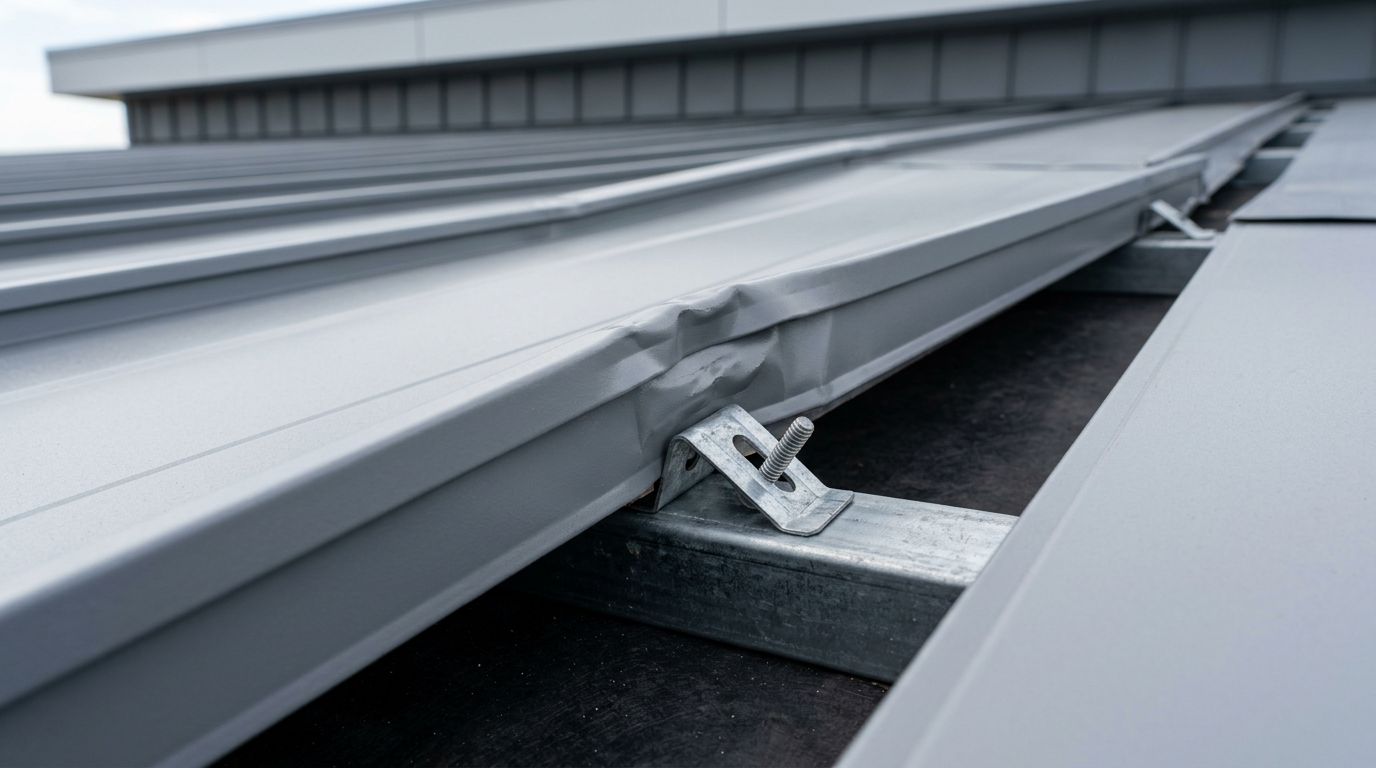
Keep placement rules just as tight as spacing rules. Many 5V systems require screws in the flat at a defined location relative to ribs and laps, with consistent washer compression. That "where on the panel" detail usually sits in the manufacturer instructions referenced by the approval.
If you want a heads-up on the most common ways crews miss these details, review common 5V crimp fastener installation mistakes in Central Florida.
Fastener spacing is only half the story. Inspectors also fail jobs for wrong screw type, missing sidelap fastening (when required), and screws driven crooked or overdriven.
What Florida inspectors look for on 5V crimp fastening
Inspectors tend to focus on items that prove the roof matches the approved system, not just that it "looks tight." Expect attention in these areas:
- Approval match : The Florida Product Approval or NOA on site matches the installed panel system.
- Zone compliance : Field, edge, and corner patterns match the schedule, with no "blended" spacing.
- Correct fasteners : Diameter, length, coating, and washer type match the approval notes.
- Proper placement : Screws land where the instructions show, not drifting into laps or ribs.
- Screw quality : No overdriven washers, no underdriven gaps, no angled fasteners.
- Edge and corner discipline : Perimeter and corner zones get the tighter pattern, every time.
- Trim and cap attachment : Ridge caps, eave trim, and rake trim are fastened per the referenced details.
For homeowners comparing bids, ask each contractor to write the field, edge, and corner spacing into the proposal, along with the approval number. If one bid can't do that, it's not apples-to-apples. If you're still deciding between profiles, this comparison of 5V crimp vs standing seam installation differences helps set expectations.
Conclusion and disclaimer
Good 5V crimp roofs in Florida aren't built on habits, they're built on tested approvals. When you follow the Florida Product Approval or Miami-Dade NOA and the linked manufacturer instructions, your 5V crimp fastener placement becomes easy to defend, easy to inspect, and far less likely to fail in storms.
Disclaimer : This article is for informational use only. Always follow the current manufacturer installation instructions, the applicable Florida Product Approval or Miami-Dade NOA, and your local Authority Having Jurisdiction (AHJ). Consult a licensed engineer for project-specific design pressures and requirements, especially in HVHZ and coastal conditions.
Share Our Metal Roofing News Articles
Related Posts