
Installing Hip Caps on Exposed-Fastener Metal Panels
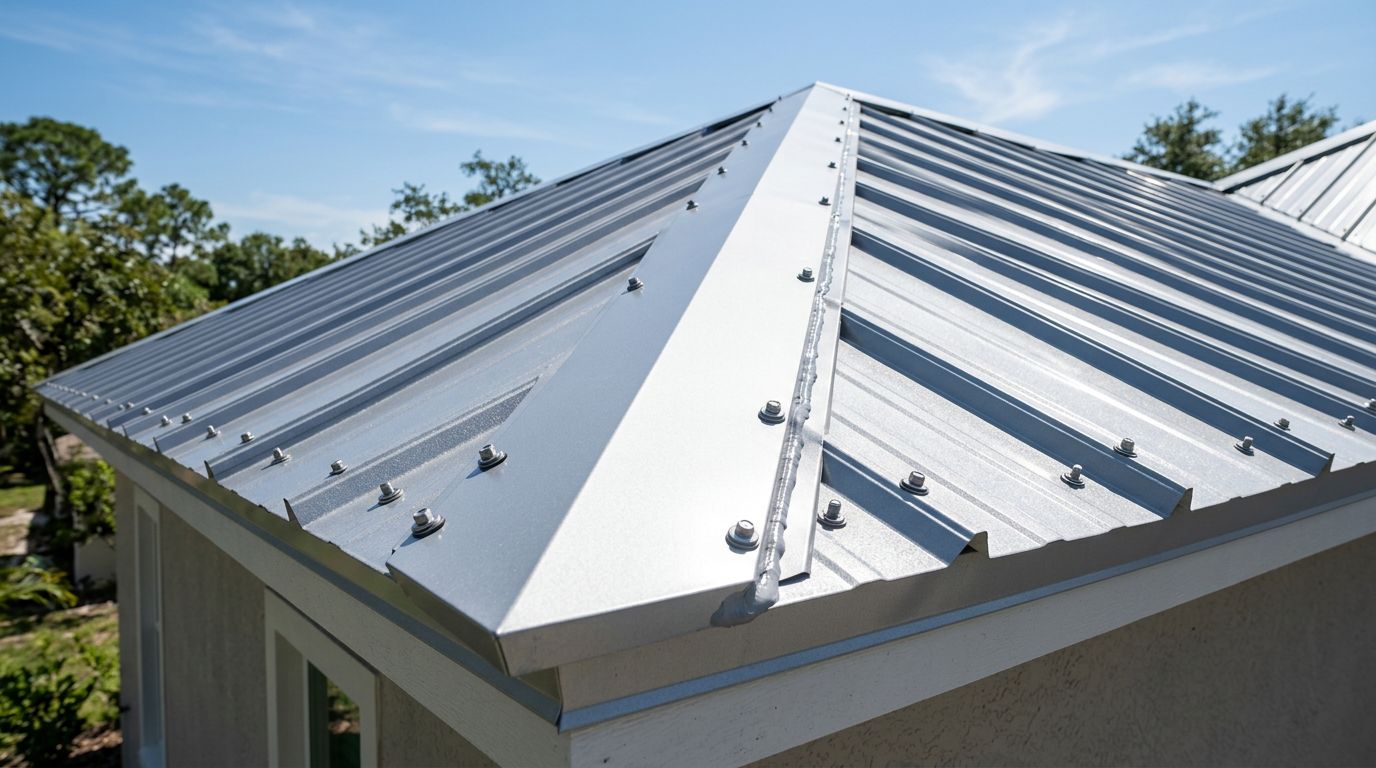
A hip cap can protect one of the most exposed areas on a metal roof, but only when it fits the panel profile and follows the roof's geometry. Poor cuts, missing closures, or loose fasteners can let wind-driven rain reach the roof framing.
Installing hip caps on exposed-fastener panels requires careful layout before the first screw goes in. The cap must cover both panel edges, seal against the ribs, and remain secure under Florida's wind and weather conditions. Follow the panel manufacturer's details and local building requirements throughout the job.
Key Takeaways
- Match the hip cap and closure strips to the exact panel profile.
- Install both roof slopes before cutting and fitting the cap.
- Use the manufacturer's overlap, sealant, and fastener requirements.
- Cut metal with tools that won't damage the protective coating.
- Stop work during rain, lightning, high winds, or unsafe roof conditions.
What a Hip Cap Does on a Metal Roof
A hip is the outside angle where two sloping roof sections meet. Unlike a ridge, which runs along the roof's highest horizontal line, a hip slopes downward toward an eave. Exposed-fastener panels meet at this angle, leaving a joint that needs a fitted cover.
The hip cap covers the cut panel edges and directs water away from the joint. It also helps block wind from lifting the panel edges. Most systems use a formed metal cap with closure material underneath. The closure follows the panel's rib pattern and fills the open spaces beneath the cap.
Exposed-fastener panels aren't interchangeable at the hip. An AG or Multi-Rib panel has a different rib arrangement from a PBR/R panel. A 5V panel has another profile and may need a different cap shape or closure detail. A cap that looks close in a supplier's display may not seal correctly on your roof.
The roof pitch also affects the fit. A steep hip and a low-slope hip create different angles, so the cap may need a specific profile or a field adjustment. Never flatten a cap by force. That can distort the metal, reduce coverage, and create channels where water collects.
The correct hip cap is part of the panel system, not a universal piece of trim.
Hip caps also need to work with the rest of the roof. The eave trim, rake trim, ridge cap, closures, sealants, and fasteners should come from compatible installation details. Mixing parts from different systems can create gaps even when each individual piece appears suitable.
Check the Roof and Materials Before Work Begins
Install the roof panels on both sides of the hip before fitting the cap. Check the manufacturer's layout instructions first, because some systems require a defined panel overhang or a particular cut line at the hip. Cutting the panels flush with the framing can leave too little metal beneath the cap.
Snap or mark the hip line only after confirming the cap's coverage. The cut should follow the roof angle and leave a clean, consistent edge. Measure at several points because small framing variations can change the gap along the hip.
Before climbing onto the roof, confirm that you have:
- The correct hip cap for the panel profile and roof pitch
- Matching solid or vented closure strips, when required
- Approved metal-to-metal screws or panel fasteners
- Compatible sealant, butyl tape, or closure adhesive
- Aviation snips, electric shears, or another approved cutting tool
- A screw gun with an adjustable clutch
- A chalk line, tape measure, square, and non-marking pencil
- Gloves, eye protection, proper footwear, and fall-protection equipment
Inspect each cap before installation. Look for bent flanges, damaged paint, oil-canning, or shipping dents. Set trim on padded supports rather than directly on gravel or concrete. Metal shavings and scratches can shorten the life of the coating.
If the hip has an unusual angle, long run, or complex intersection, confirm the trim dimensions before ordering material. A supplier with in-house trim fabrication may be able to produce a piece that matches the roof instead of forcing a standard cap to fit.
Step-by-Step Hip Cap Installation
1. Establish a safe work area
Metal roofing work requires stable footing and controlled movement. Use a properly placed ladder, keep tools secured, and follow the fall-protection requirements for the roof height and pitch. Wear cut-resistant gloves when handling panels and trim.
Avoid walking on unsupported panel edges or directly on high ribs unless the manufacturer's instructions allow it. Panels can deform, and the sharp edges can cause serious cuts. Florida heat also makes metal surfaces hot, so plan breaks and hydration before fatigue affects your footing.
2. Finish and inspect the panel cuts
Install the panels on both roof faces, then mark the hip cut according to the approved detail. Use snips, electric shears, or another tool that produces a clean cut without burning the coating. An abrasive saw can leave hot metal particles that rust or damage nearby painted surfaces.
Remove burrs from the cut edge, but don't widen the cut or flatten the ribs. Sweep away filings with a soft brush. Metal shavings left on the roof can stain the finish when they oxidize.
Check the panel alignment before covering the joint. The cut edges should form a consistent line, and the cap should have enough width to cover the joint on both sides. If the cap rocks, binds, or leaves an uneven gap, correct the issue before applying sealant.
3. Fit the closure material
Place the closure strip where the manufacturer's detail shows it, usually beneath the hip cap along the panel ribs. The closure should follow the panel contour without stretching, bunching, or leaving open sections.
Some systems use solid closures, while others specify a different material. A closure intended for a ridge vent may not be suitable on a hip. Use only the type approved for that panel and location.
Apply sealant or adhesive as directed. Keep the bead continuous at joints and transitions, but avoid adding thick, random layers that prevent the cap from sitting flat. Sealant should support the designed weather seal, not replace a missing closure.
4. Position the first cap section
Many hip-cap systems begin at the lower end of the hip and continue upward, but the manufacturer's instructions control the direction and overlap. Place the first section carefully because every later piece follows its alignment.
Keep the cap centered over the hip. Its flanges should cover the panel edges evenly, and the lower end should meet the eave trim without blocking the planned drainage path. Don't close the bottom of the hip in a way that traps water or debris.
Use a temporary screw or a light hand hold to check the position before permanent fastening. Look along the full length of the cap. A small alignment error at the eave can become a large gap near the ridge.
5. Fasten the cap without damaging it
Install screws at the locations and spacing required by the panel manufacturer or approved detail. Fasteners may pass through the cap flange and into the panel high rib, purlin, or other structural support, depending on the system.
Set the screw gun clutch before starting production work. The washer should seat firmly against the metal without squeezing out or cutting through the rubber. An overdriven screw creates a weak spot, while an underdriven screw may allow water under the washer.
Keep screws straight and avoid placing them too close to a cut edge. Remove metal filings after fastening. If a fastener misses its intended support, don't leave the hole open. Repair it using the manufacturer's approved method.
6. Overlap and seal each additional section
Fit the next cap section over the previous one using the specified overlap. Apply the required sealant or butyl material within the overlap, then fasten the joint as directed. The overlap should face the direction that prevents water from entering as it flows down the hip.
Continue checking the cap's centerline as you work. Don't let one section drift toward either roof slope. At the upper end, coordinate the hip cap with the ridge cap or other approved transition detail. That connection needs coverage and sealant without blocking drainage.
Common Problems to Avoid
A few installation shortcuts cause most hip-cap failures. Using a generic cap is one of them. The cap may cover the joint visually but fail to match the rib height, leaving a wind-driven path beneath the flange.
Another problem is cutting the panels before confirming the cap width. If too much panel is removed, the cap can't achieve the required coverage. Replacing a panel is safer than trying to stretch trim across an oversized opening.
Avoid relying on sealant alone. Sealant can shrink, separate, or lose adhesion when the underlying gap is too large. Closures and mechanical fasteners work together with the sealant.
Don't mix screw types without checking the details. A fastener designed for panel-to-framing connections may not be correct for a cap overlap. Likewise, a washer damaged during installation shouldn't remain in the roof.
A neat bead of caulk cannot correct a cap that is the wrong size or poorly aligned.
Finally, don't install trim over wet, dirty, or oily surfaces. Clean contact areas first, and follow the sealant manufacturer's temperature and surface requirements. If the cap must be removed, replace damaged sealant and washers instead of reinstalling them blindly.
Florida Safety, Wind, and Code Checks
Florida roofs face intense sun, heavy rain, tropical weather, and strong wind requirements that vary by location. Before installation, review the current Florida Building Code, local amendments, and the product approval or engineering documents that apply to the project.
The approved documents may control screw type, spacing, panel support, cap attachment, and roof-edge details. Don't substitute a different fastening pattern because it seems adequate. The hip is a roof edge, so wind design can make its attachment more demanding than the field of the roof.
A final inspection should confirm that every cap section is secure, every overlap is sealed, closures remain seated, and no exposed cut edge extends beyond the intended coverage. Check the eave and ridge transitions from multiple angles. Remove all filings, loose sealant, packaging, and sharp scraps from the roof and gutters.
Homeowners should hire a qualified roofing contractor for steep, tall, or complex roofs. Contractors should stop work when surfaces are wet, winds make material handling unsafe, or lightning is nearby. No trim detail is worth a fall.
Conclusion
Installing hip caps on exposed-fastener panels is a precision job. The cap must match the panel profile, follow the roof angle, sit over properly cut panels, and connect securely with the right closures, sealants, and fasteners.
Start with the manufacturer's details and applicable Florida requirements, then verify each section as you work upward. A well-fitted hip cap protects the joint because its geometry and attachment work together, not because sealant hides a poor fit.
Share Our Metal Roofing News Articles
Related Posts




