
How to Flash a Metal Roof at a Pitch Change
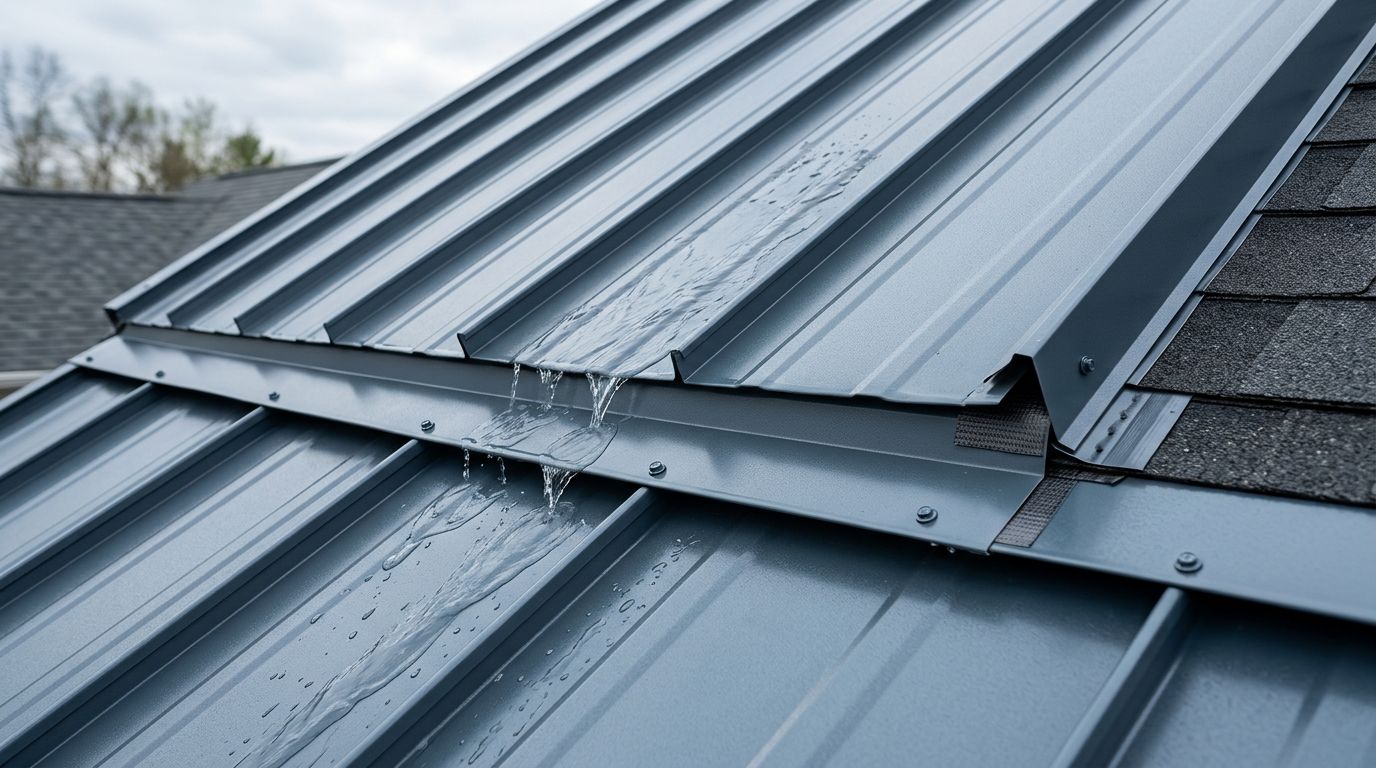
A roof pitch change creates one of the most leak-prone points in a metal roofing system. Panels meet at a break, water changes direction, and small gaps can expose the underlayment and roof framing.
The correct approach is to install a transition flashing that matches the panel profile, roof slope, and fastening method. A generic piece of bent metal or a bead of caulk can't replace a tested manufacturer detail. Before you start, confirm the required dimensions, closures, fasteners, sealants, and lap directions for your panel system.
Key Takeaways
- Use a panel-specific transition detail. AG/Multi-Rib, PBR/R, 5V, and standing seam systems require different flashing methods.
- Keep water moving downhill. Flashing must direct runoff across the pitch break without trapping debris or blocking drainage.
- Follow written specifications. Flashing sizes, fastening patterns, sealants, and closure requirements vary by roof pitch and panel manufacturer.
- Protect the roof during installation. Use fall protection, avoid wet or windy conditions, and don't walk on panels outside approved areas.
- Hire a qualified installer for complex work. Steep roofs, standing seam systems, structural damage, and high-wind Florida locations require careful planning.
Why a Metal Roof Pitch Change Needs Special Flashing
A pitch change, also called a pitch break or roof transition, occurs where one roof plane changes angle and continues into another plane. The upper section may be steeper than the lower section, or the lower section may flatten before reaching an eave.
At this location, panels usually don't overlap in the same way they do across a straight roof plane. The transition flashing bridges the change in angle and gives water a controlled path over the joint. It also closes the openings created by panel ribs, seams, and the change in panel direction.
First, identify the shape of the transition. A raised break, where the roof angle turns outward, uses a different detail than an inside corner that collects water. An inside corner may function as a valley and needs valley flashing, not a standard pitch-break trim. If the upper roof ends against a wall, use a headwall flashing detail instead.
The panel profile also controls the flashing design. Exposed-fastener panels such as AG/Multi-Rib and PBR/R often use formed transition trim with profile-matched closures. A 5V panel has a different rib layout. Standing seam panels usually require a manufacturer-made transition with concealed clips or seams.
Never assume that flashing from one metal roof profile will fit another. The rib spacing, seam height, panel coverage, and fastening method can all differ.
Roof pitch matters as well. A detail designed for one slope may not provide enough overlap or drainage on another. Use the panel manufacturer's minimum slope, transition dimensions, and approved installation instructions. Also check applicable local codes and Florida product approval documents when the project requires them.
Materials and Tools for Transition Flashing
Gather the materials before removing panels or opening the roof. The flashing should match the metal type, finish, profile, and movement requirements of the roof system.
You may need:
- Manufacturer-approved transition flashing or custom-formed break trim
- Underlayment compatible with the roof assembly
- Profile-matched foam closures or other approved closure material
- Butyl tape and the specified roofing sealant
- Manufacturer-approved screws, clips, washers, and stitch fasteners
- Replacement panels or trim if the existing pieces won't fit the new detail
- Tin snips, electric shears, or a nibbler
- Tape measure, chalk line, square, and marker
- Hand seamer and metal files for controlled bends and safe edges
- Drill driver with the correct bit
- Gloves, eye protection, and fall-protection equipment
Avoid abrasive saw blades when cutting coated panels. Hot metal particles can burn the finish and leave exposed spots that corrode. Use tools that produce clean cuts, then remove sharp burrs before installing the piece.
Don't substitute household caulk, roofing cement, or an unapproved silicone for the specified sealant. Sealant must remain compatible with the panel coating, flashing metal, underlayment, and temperature range at the roof.
How to Flash a Metal Roof at a Pitch Change
The sequence below describes a common transition arrangement. Your panel instructions may change the order or require a different trim profile.
1. Confirm the roof layout and transition detail
Measure the roof planes, panel coverage, and location of the pitch break. Check whether the transition is convex, concave, or tied into a wall. Then review the manufacturer's drawing for the panel profile and slope.
Mark the line where the angle changes. Check that the roof framing and sheathing provide continuous support beneath the flashing. Soft decking, sagging framing, or standing water must be corrected before installing new metal.
Plan the panel layout so the transition doesn't create a narrow strip that can't be fastened correctly. Also locate seams, penetrations, vents, and nearby fasteners that could interfere with the trim.
2. Install or repair the underlayment
The underlayment should cover the roof planes and continue through the transition according to the roofing system's instructions. Remove loose, torn, or contaminated material before adding new underlayment.
Lap the upper piece over the lower piece in the direction water travels. Keep laps tight and avoid wrinkles that could hold water beneath the metal. In Florida, use the underlayment type and attachment method required by the approved roof assembly and local code.
Don't use underlayment to compensate for an incorrect flashing design. It is a secondary water-resisting layer, not the primary drainage path.
3. Set the transition flashing
Dry-fit the transition trim before applying sealant or fasteners. The lower flange should direct water onto the lower roof plane, while the upper flange should extend beneath the upper panel or its designated closure.
Many systems use a formed angle that follows the pitch break. Others use separate pieces with a designed overlap. Maintain the dimensions shown in the installation instructions. The correct flange width, hem, bend angle, and lap cannot be selected safely by appearance alone.
Apply butyl tape or sealant only where the manufacturer specifies it. Keep the drainage edge open, and don't create a dam that traps leaves or rainwater. Where long pieces meet, form the lap in the downhill direction and seal it according to the approved detail.
4. Install closures at the panel ribs
Place profile-matched closures where the panel ribs meet the transition flashing. These pieces close wind-driven rain and insects out of the openings while supporting the trim near the panel ribs.
Press the closures into position without stretching or distorting them. Follow the system's instructions for whether the closure sits above or below the panel edge. A closure made for AG/Multi-Rib won't correctly seal a PBR/R, 5V, or standing seam profile.
Pay close attention to corners and panel ends. Gaps at these points can allow wind-driven rain into the roof assembly even when the center of the transition looks sealed.
5. Fasten the flashing and panels
Install the approved fasteners in the specified pattern. Use the correct screw length, washer type, and corrosion-resistant finish for the roof system and local environment.
Drive screws until the washer compresses evenly. Overdriving can damage the washer and distort the metal. Underdriving can leave a path for water. Keep fasteners aligned and avoid placing them where they interfere with panel movement or the designed drainage channel.
Exposed-fastener panels commonly use fasteners through the panel and trim, while standing seam roofs may rely on clips, locks, or concealed attachment. Don't add face screws to a standing seam panel unless the manufacturer approves that method.
Allow for thermal movement where the system requires it. Long metal panels and transition trim expand and contract with temperature changes. A rigid connection in the wrong location can buckle the panel or open a seam.
6. Inspect the completed transition
Before closing nearby work, inspect every lap, closure, fastener, and cut edge. Remove metal filings and loose debris that could stain the finish or start corrosion.
Confirm that the upper flashing edge is covered as required, the lower edge sheds water, and no sealant blocks the drainage path. If a controlled water test is allowed by the manufacturer, run water over the upper roof area and observe the transition from below. Don't spray water under laps or use a pressure washer.
If the roof leaks during testing, dry the area and correct the flashing detail. Adding surface caulk over the suspected leak often hides the problem without fixing the drainage path.
Common Pitch-Change Flashing Mistakes
Several installation errors appear repeatedly at roof transitions. Most begin with using a convenient material instead of the approved system detail.
- Using flat sheet metal without formed bends. Flat metal can't maintain the required angle, overlap, or support at the pitch break.
- Mixing trim and panel profiles. A closure or transition made for another rib pattern may leave continuous openings.
- Reversing the lap direction. The upper piece should shed water onto the lower piece, not create an uphill pocket.
- Relying on exposed caulk. Sealant supports a flashing assembly, but it shouldn't replace proper overlap, closures, and mechanical attachment.
- Overdriving screws. Crushed washers and distorted panels can leak soon after installation.
- Blocking drainage with closures or sealant. A completely sealed-looking joint can still fail if water has nowhere to go.
- Ignoring dissimilar metals. In coastal Florida, incompatible metals and damaged coatings can accelerate corrosion, especially where salt air is present.
Flashing dimensions, fastener spacing, sealants, and closure requirements vary by metal panel system and roof pitch. Follow the manufacturer's specifications and applicable local codes rather than copying a detail from another roof.
When Professional Installation Makes Sense
A homeowner may handle ground-level preparation or simple trim work, but roof transitions require careful judgment. Hire a qualified metal roofing contractor when the roof is steep, high, wet, or difficult to access. Professional installation is also appropriate when the decking is damaged, the transition has ponding water, or the roof connects to walls, valleys, vents, or skylights.
Standing seam systems deserve extra care because their clips, seams, and movement allowances differ from exposed-fastener panels. A mistake can damage the seam lock and compromise a large section of roof.
Florida projects also face heavy rain, wind-driven water, high humidity, and coastal corrosion. Check local permit requirements and use the approved roof assembly for the building. A contractor can verify attachment, product approvals, and code requirements before work begins.
Don't climb onto a roof without proper fall protection and a safe access plan. Stop work during lightning, rain, strong wind, or unsafe heat conditions. If you can't keep both hands available for controlled metalwork, the job should go to a professional.
Conclusion
A reliable pitch-break flashing detail directs water across the angle, closes panel ribs, and allows the metal to move without opening the joint. The exact trim shape, fastening pattern, sealant, and closures depend on the roof profile and slope.
Before you flash a metal roof at a pitch change , identify the transition type and follow the panel manufacturer's instructions. When the roof is steep, complex, or exposed to Florida's demanding weather, professional installation protects the roof assembly and the people working on it.
Share Our Metal Roofing News Articles
Related Posts




